Quantcast
Channel: Jason Lee's Blog
Viewing all 56 articles
Browse latest View live

Product Catalog Sites and the Product Hierarchy Term Set

$
0
0
We recently ran into a perplexing issue with SharePoint 2013. We'd create a Managed Metadata service application, and we'd be able to create and use term sets without any issues. However, when we created a Product Catalog site, the site collection term store group and the Product Hierarchy term set did not get created. This is a fairly major roadblock, as the entire structure of the site (e.g. the Item Category site column, the Products list) is built around this term set.

In other words, you click this:


You expect to see this:


But you actually see this:


The Solution

 
On the properties for your Managed Metadata service proxy, you need to select the option This service application is the default storage location for column specific term sets. To do this, in the list of service applications, select the Managed Metadata service application proxy (be sure to select the proxy, not the service application itself). Then, on the ribbon, click Properties


Next, on the Edit Managed Metadata Service Connection dialog, select This service application is the default storage location for column specific term sets, and then click OK:
 

Next time you create a Product Catalog site collection, you should find that the site collection term set group and the Product Hierarchy term set are present. Unfortunately, this step isn't retroactive - you need to configure the Managed Metadata service application proxy before you create the Product Catalog site.

The This service application is the default storage location for column specific term sets option is selected automatically if you use the Farm Configuration Wizard to provision your Managed Metadata service application, but not if you create the Managed Metadata service application manually. It's not necessarily obvious that Product Hierarchy is a column-specific term set, but when you think about it the term set is specific to the Item Category site column within each Product Catalog site.

Another Reason to Stop Developing Sandboxed Solutions

$
0
0
As you probably know by now, sandboxed solutions are no longer a preferred approach to development in SharePoint 2013. Wherever possible, you should use develop your custom functionality within a SharePoint app. If SharePoint apps don't offer the capabilities you require, you probably need a farm solution anyway, which leaves sandboxed solutions in a distant third place for SharePoint development.

However, there may still be reasons that compel you to create a sandboxed solution for SharePoint 2013. (In my case, it's because I'm writing a course that needs to cover sandboxed solution development). If so, there is a limitation you need to be aware of:

You can't run sandboxed code on a single server installation of SharePoint 2013 on Windows Server 2012 + domain controller.

You can install and activate the solution without any problems, but any sandboxed code will throw the following error:

An unknown exception occurred while executing a sandboxed code solution request in the worker process.

A quick trawl of the forums - e.g. here - suggests that this problem is specific to Windows Server 2012 + DC configurations. Now, we all know that running SharePoint on a domain controller is unsupported in production environments. At the same time, many developers - including myself - find a single-server development environment vastly preferable to a multi-server development environment. If you run a development server and a domain controller on separate VMs, it can be a real battle to keep the VMs in sync when you use snapshots and reverts.

The single server development environment works just fine for SharePoint apps and farm solutions. However, if you want to develop sandboxed solutions, you'll either need to install your single server development environment on Windows Server 2008 R2, or you'll need to run your DC on a separate VM.

Adding Active Directory OU Members to a SharePoint 2013 Group

$
0
0
Over the last few months we've been busy writing the SharePoint 2013 developer courseware for Microsoft (check out 20488B and 20489B). That hasn't left much time for blogging, so I plan to write a few quick posts on some of the more tricky things we had to figure out along the way.

First up: how to use PowerShell to import a bunch of users from an Active Directory OU into SharePoint and add them to a group. The script below does the following:
  1. It adds a new group named Finance Members to the specified site.
  2. It links the group to the site as the associated members group.
  3. It grants the Contribute permission level to the group.
  4. It gets all the members of the Managers OU from Active Directory.
  5. It adds each AD user to the Finance Members group.

# Variables
$siteUrl = "http://finance.contoso.com"
$groupName = "Finance Members"
$groupDescription = "Members of this group can contribute to the Finance site."

# Load the SharePoint PowerShell snap-in
Write-Host "Loading SharePoint PowerShell snap-in..." 
Add-PSSnapin "Microsoft.SharePoint.PowerShell"
Write-Host "Done"
Write-Host

Write-Host "Creating site members group..."
$web = Get-SPWeb $siteUrl
$web.SiteGroups.Add($groupName, $web.CurrentUser, $web.CurrentUser, $groupDescription)
$membersGroup = $web.SiteGroups[$groupName]
$web.AssociatedMembersGroup = $membersGroup

Write-Host "Granting contribute permissions to group..."
$membersGroupAssignment = New-Object Microsoft.SharePoint.SPRoleAssignment($membersGroup)
$membersRoleDef = $web.RoleDefinitions["Contribute"]
$membersGroupAssignment.RoleDefinitionBindings.Add($membersRoleDef)
$web.RoleAssignments.Add($membersGroupAssignment)
$membersGroup.Update()

Write-Host "Adding members of Managers OU to the SharePoint group..."
$adUsers = Get-ADUser -Filter * -Searchbase "OU=Managers,DC=contoso,DC=net"
foreach($adUser in $adUsers)
{
   Write-Host "...adding user $(adUser.UserPrincipalName) ..." -ForegroundColor Gray
   $user = $web.EnsureUser($adUser.UserPrincipalName)
   $membersGroup.AddUser($user)
}
$web.Update()
$web.Dispose()

Write-Host "Finished." -ForegroundColor Green

And there you have it. Essentially, we're using the SharePoint server-side object model to do most of the work, and the Get-ADUser cmdlet to get users from our AD OU. The Get-ADUser cmdlet provides a bunch of parameters for LDAP queries and the like, so check out the Get-ADUser documentation on TechNet if you want to get clever.

Default Value for Secure Store Implementation Field

$
0
0
When you import a BDC model into Central Administration in SharePoint 2013, you often need to configure it to use a Secure Store Target Application. This is straightforward to an extent:
  1. Browse the external systems in your BDC service application.
  2. Click through to the settings of the external system that corresponds to your BDC model.
  3. Select an appropriate Authentication Mode for your Secure Store Target Application (Impersonate Windows Identity or Impersonate Custom Identity).
  4. Provide the target application ID for your secure store target application.
The tricky bit is that SharePoint expects you to provide a value for Secure Store Implementation. If you've changed the authentication mode from User's Identity or BDC Identity, this field will be blank:


What you actually need to type in this Secure Store Implementation field is the fully-qualified type name for the secure store provider. Unless you've built your own secure store provider (in which case you're the ultimate SharePoint guru), this value will always be the same:

Microsoft.Office.SecureStoreService.Server.SecureStoreProvider, Microsoft.Office.SecureStoreService, Version=15.0.0.0, Culture=neutral, PublicKeyToken=71e9bce111e9429c

Copy that typename into the Secure Store Implementation field and you should be good to go. I've had to hunt this value down on several occasions, so hopefully having it here for easy copy-and-paste will come in useful.

SharePoint 2013: Creating Site Columns using the JavaScript Object Model

$
0
0
Today's tricky task is creating a SharePoint 2013 site column using the JavaScript object model. It's not actually difficult, but at the time of writing the product documentation doesn't make it clear how to go about it.

If you want to create a site column programmatically in server-side code, you can go about it in various ways. To start with, you retrieve the Fields collection of a SharePoint web. You can then add a field to the collection by calling SPFieldCollection.Add or SPFieldCollection.AddFieldAsXml. However, the client-side object models are a little more limited.

The JSOM and the managed client object models both include a FieldCollection.Add method. However, you can't use these methods to add a create a new field (believe me, I spent some time trying). Instead, these methods are used for adding existing fields to new collections - for example, adding a site column to the fields collection of a list. If you want to create a site column in client-side code, you must use the FieldCollection.AddFieldAsXml method. This method works in exactly the same way as its server-side equivalent - you build your field schema as a CAML string and pass it as an argument to the method:

var context;
var web;
var fields;

var addField = function () {
   context = new SP.ClientContext.get_current();
   web = context.get_web();
   fields = web.get_fields();
   var fieldSchema = '<Field Type="DateTime" \
                             Name="ExpiryDate" \
                             DisplayName="Expiry Date" \
                             Format="DateOnly" \
                             Required="TRUE" \
                             Group="Contoso Columns" />';
   fields.addFieldAsXml(fieldSchema, false, SP.AddFieldOptions.addFieldCheckDisplayName);
   context.executeQueryAsync(onAddFieldSuccess, onAddFieldFail);
}


var onAddFieldSuccess = function () {
   alert('Field created');

}

var onAddFieldFail = function () {
   alert('Something went wrong');

}

The FieldCollection.AddFieldAsXml overload in the example takes three arguments. The first is the CAML string that defines your column. The second is a Boolean value that indicates whether or not you want to add the field to the default view - this is a moot setting in this case as we're creating a site column rather than a list column. Finally, the third is an SP.AddFieldOptions enumeration value that enables you to combine various options to specify how your column is created.

Custom Workflow Activity for Creating a SharePoint Site

$
0
0
Recently I've had to automate various SharePoint 2013 site management tasks within workflows. I started out using SharePoint Designer 2013, but switched to building custom workflow activities in Visual Studio 2012 to give me a bit more flexibility and reusability (and to reduce the likelihood of SPD screwing up my work). I've developed custom workflow activities that perform the following tasks:
All of these activities involve calling SharePoint web services. I've used the REST API where it supports the operation, and I've used client-side object model (CSOM) XML directly when the REST API won't do what I need. (Huge thanks to Chris Givens for showing me how to work with CSOM XML). I'm hoping to document each of these activities and I'll add links to the list above.

In this post I'll show you how to build a workflow activity that creates a SharePoint site.

Prerequisites

To run these activities, your workflow service needs to be running with app permissions and it needs full control rights on the entire site collection. For guidance on how to set this up please refer to Create a workflow permissions by using the SharePoint 2013 Workflow platform on MSDN. I don't want to dwell on this as it's well-documented elsewhere - however, please note that to grant full control across the entire site collection, rather than a specific site, you need to replace the permission request XML in the MSDN article with the following:

<AppPermissionRequests>
   <AppPermissionRequest Scope="http://sharepoint/content/sitecollection" Right="FullControl" />
</AppPermissionRequests>

(Use this exactly as is - don't replace the Scope attribute with a specific URL.)

Fundamentals

You can use the REST API to create a site. You need to send a web request that resembles the following:

Endpoint:
{site collection URL}/_api/web/webinfos/add

HTTP method:
POST

Headers:
Accept: application/json; odata=verbose
Content-Type: application/json; odata=verbose

Body:
{"parameters":{
   "Url":"project1",
   "Title":"Project One",
   "Description":"A description of Project One",
   "Language":"1033",
   "WebTemplate":"STS#0",
   "UseUniquePermissions":true,
   "__metadata":{
      "type":"SP.WebInfoCreationInformation"
   }
}}

Note that the __metadata variable is preceded by a double underscore. This post from SharePoint Ryan really helped me figure out how to structure the JSON body.

Note also that you don't need to include an X-RequestDigest header when you're calling services from a SharePoint workflow - the workflow platform will add any required security headers for you.

Build the XAML file

To develop custom workflow activities for SharePoint 2013, you need to create an empty SharePoint 2013 project in Visual Studio 2012. You're going to deploy it as a sandbox solution (this is fine for Office 365 as the workflow activity is entirely declarative). You can then add workflow activities to the project by selecting the Workflow Custom Activity template from the Office/SharePoint category on the Add New Item menu.

Visual Studio will create a .xaml file and an .actions4 file for your workflow activity. The .xaml file is where you define your workflow logic, and the .actions4 file is where you configure your activity for use in SharePoint Designer. By default, Visual Studio will open the .xaml file in designer view.

In this case, I'll start by defining the arguments and variables for my workflow activity. Arguments define the values that you want to pass to and from your activity, whereas variables store values for use within your activity. You can define arguments and variables by clicking Arguments or Variables respectively at the bottom of the designer window.

To start with, I'll define the following arguments:


The In arguments define the values that I want the consumer of my activity to provide, and the Out arguments define the values that my activity will return to the consumer. In this case I simply want to return the status code returned when I call the web service (to enable the consumer to respond if something went wrong) and the GUID ID of the site I've created.

Next, I'll define the following variables:


You'll see the reason for each of these as we build up the activity, but for now note that DynamicValue is a data structure for building nested sets of key-value pairs in a workflow. This is particularly useful when you're constructing JSON requests. Where you would have used a Dictionary type in SharePoint Designer, use a DynamicValue in Visual Studio.

Now we can build up the activity by dragging activities from the Toolbox on to the designer surface. The complete activity looks like this:


As you can see, the activity consists of six child activities, all of which are built-in activities that you can add from the toolbox. Let's run through each of these in turn.

Step 1: Get current site URL

In this activity, we want to get the URL of the current site collection. I've used a LookupWorkflowContextProperty activity to do this. In the activity properties, I'm looking up the current site URL and assigning it to the siteUrl variable.


Step 2: Build the REST URL

In this activity, we want to build on the site URL to form a REST endpoint for our request. I've used an Assign activity to do this. In the activity properties, I'm concatenating the site URL and the site-relative REST endpoint, and assigning the result to the restUrl variable.


Step 3: BuildDynamicValue (jsonRequest)

In this activity, we build the JSON body for our REST request. I've used a BuildDynamicValue activity to do this.


To define the properties in the jsonRequest variable, click the ellipsis in the Properties row. This enables you to provide a set of key/value pairs:


For each path (key) you define, you can enter a string literal, a local variable or an argument in the Value column. In this case, I've assigned one of the arguments I defined earlier to each key. Notice how the structure of the paths are constructed with forward slashes. This is a shorthand way of adding nested values to the variable, by using XPath notation to define the path to each key. After setting these properties, the content of the jsonRequest variable will resemble the following:

{
   "parameters":{
      "Url":"project1",
      "Title":"Project One",
      "Description":"A description of Project One",
      "Language":"1033",
      "WebTemplate":"STS#0",
      "UseUniquePermissions":true,
      "__metadata":{
         "type":"SP.WebInfoCreationInformation"
      }
   }
}

Step 4: Call the REST API method

We've now set all the variable values we need, so we're ready to call the REST method. I've used the HttpSend activity to do this. You can configure every aspect of the request through the activity properties pane:


In this case, I've:
  • Set the HTTP Method to POST.
  • Set the content of the request to the value of our jsonRequest variable.
  • Set the Uri for the request to the value of our restUrl variable.
  • Assigned the response body to the responseContent variable (this is a DynamicValue instance, because we're expecting a JSON response).
  • Assigned the response headers to the responseHeaders variable (again, a DynamicValue instance).
  • Assigned the response status code to the responseStatusCode variable (an HttpStatusCode enumeration value).
The other thing you need to do at this stage is to configure the request headers for the service call. To do this, click the ellipsis in the RequestHeaders row. This enables you to define your request headers as key/value pairs:


Step 5: Assign responseStatusCodeOut

At this point in the execution of our workflow activity, we've called the REST API method and a new site has hopefully being created. Now all we need to do is extract any information we need from the HTTP response. In this Assign task, I'm taking the responseStatusCode variable, converting it to a string, and assigning it to the responseStatusCodeOut argument. The reason for this is that SharePoint Designer doesn't like complex types like HttpStatusCode and DynamicValue. If you want to return information to SharePoint Designer, you need to convert your properties to an SPD-friendly type. In this case, we simply call the ToString method on our responseStatusCode variable and assign it to the String-based responseStatusCodeOut argument:


Step 6: Get site GUID

In this final child activity, we want to get the ID of the newly-created site so that we can return it to consumers of our workflow activity. I've used a GetDynamicProperty<T> activity to do this. This activity enables you to extract a strongly-typed value, in this case a System.Guid, from a DynamicValue variable.


In this case, we want to extract a property from the responseContent variable. This is a variable of type DynamicValue that stores the response from the web service call. To extract a property from a DynamicValue, you use XPath to specify the path (in this case "d/Id") to the property you want. I've assigned the extracted property to the newSiteIdOut argument.

To specify the path to the property you want, you need to know how the JSON returned by the REST API is structured. The best way to do this is view the REST service calls in a web debugger such as Fiddler. In this case, the format of the response resembles the following:

{
   "d":{
      "__metadata":{
         "id":"http://team.jason.net/_api/web/webinfos/add",
         "uri":"http://team.jason.net/_api/web/webinfos/add",
         "type":"SP.WebInformation"
      },
      "Configuration":0,
      "Created":"2014-01-22T14:08:38",
      "Description":"A description of Project One",
      "Id":"6e504370-0ea5-48b1-ad12-8f5d6cd23b23",
      "Language":1033,
      "LastItemModifiedDate":"2014-01-22T14:08:44Z",
      "ServerRelativeUrl":"/project1",
      "Title":"Project One",
      "WebTemplate":"STS",
      "WebTemplateId":0
   }
}

From this response, you can see that specifying a path of "d/Id" will take you to the ID of the newly-created site.

Build the Actions File

Now that we've defined the logic for our workflow activity, we need to edit the .actions4 file so we can use the activity in SharePoint Designer. The .actions4 file defines the sentence that appears in SPD when you add the activity to a workflow, together with the arguments defined in the workflow activity. In this case, your .actions4 file should resemble the following:

<Action Name="Create Site" 
        ClassName="SiteManagementActivities.CreateSite" 
        Category="Site Management Activities" 
        AppliesTo="all">
  <RuleDesigner Sentence="Create a new subsite at the relative URL %1 using site template %2, title %3, description %4, locale ID %5, and unique permissions %6 (Output: %7 %8)">
    <FieldBind  Field="relativeUrl" Text="Relative URL" Id="1" />
    <FieldBind  Field="siteTemplate" Text="Site Template" Id="2" />
    <FieldBind  Field="title" Text="Title" Id="3" />
    <FieldBind  Field="description" Text="Description" Id="4" />
    <FieldBind  Field="lcid" Text="LCID" Id="5" />
    <FieldBind  Field="useUniquePermissions" Text="Use Unique Permissions" Id="6" DesignerType="Bool" />
    <FieldBind  Field="responseStatusCodeOut" Text="Response Status Code" Id="7" />
    <FieldBind  Field="newSiteIdOut" Text="New Site Id" Id="8" />
  </RuleDesigner>
  <Parameters>
    <Parameter Type="System.String, mscorlib" Direction="In" Name="relativeUrl" />
    <Parameter Type="System.String, mscorlib" Direction="In" Name="siteTemplate" />
    <Parameter Type="System.String, mscorlib" Direction="In" Name="title" />
    <Parameter Type="System.String, mscorlib" Direction="In" Name="description" />
    <Parameter Type="System.String, mscorlib" Direction="In" Name="lcid" />
    <Parameter Type="System.Boolean, mscorlib" Direction="In" Name="useUniquePermissions" />
    <Parameter Type="System.String, mscorlib" Direction="Out" Name="responseStatusCodeOut" />
    <Parameter Type="System.Guid, mscorlib" Direction="Out" Name="newSiteIdOut" />
  </Parameters>
</Action>

In the RuleDesigner element, you use the Sentence attribute to define the sentence you want to display in SharePoint Designer. You use placeholders in the format %1 where you want the user to be able to bind values to an argument (regardless of whether the argument is inbound or outbound). For each placeholder, you must add a FieldBind element with the following attributes:
  • Field. This identifies the name of the argument as it appears in your .xaml file. Make sure the name here matches the name of your argument in the .xaml file exactly.
  • Text. This specifies the placeholder text you want to display in the sentence in SharePoint Designer.
  • Id. This identifies the corresponding placeholder in the Sentence attribute.
  • DesignerType. This optional attribute specifies the type of control you want to display in SharePoint Designer. For example, a value of Bool enables the user to specify a Boolean value by clicking Yes or No. If you don't include a DesignerType attribute value, you get the default field editor in SPD - a text box with an ellipsis button and a function button.
Next, you must add a Parameter element for each argument. This specifies the .NET type and the direction of each argument. The Name attribute of each Parameter element must:
  • Match the Field attribute of the corresponding FieldBind element.
  • Match the name of the argument as it appears in your .xaml file.

Use the Activity in SharePoint Designer

To use the Create Site activity in SharePoint Designer, you need to deploy the sandbox solution to the root site of your site collection and then activate the feature that contains your workflow activity. To get the activity to show up (or update) in SharePoint Designer, you first need to close SharePoint Designer and clear the SPD cache. To do this, delete the contents of the following folders:
  • %USERPROFILE%\AppData\Local\Microsoft\WebsiteCache
  • %APPDATA%\Microsoft\Web Server Extensions\Cache
Tip: on my developer VM I use a post-build script to do this - manually clearing the folders quickly gets tedious.

You should then find your custom activity on the Action menu in SPD:


    Note that the action category, in this case Site Management, shows up as you defined it in the Action element in your .actions4 file. You can then start plugging values into your activity and build a workflow around it.


    Custom Workflow Activity for Creating a SharePoint Group

    $
    0
    0
    In my last post I looked at how to create a custom workflow activity in Visual Studio 2012 for creating sites in SharePoint 2013. In this post I'll show you how to build a workflow activity that creates a SharePoint group.

    Note: this is part of a series of posts on building workflow activities to manage sites, groups, users and permissions. For a complete list of posts, together with a more detailed walkthrough of how to build a custom workflow activity and make it available in SharePoint Designer, start at the beginning.

    Fundamentals

    You can use the REST API to create a new SharePoint group. You need to send a web request that resembles the following:

    Endpoint:
    {site collection URL}/_api/web/sitegroups

    HTTP method:
    POST

    Headers:
    Accept: application/json; odata=verbose
    Content-Type: application/json; odata=verbose

    Body:
    {   "__metadata":{
          "type":"SP.Group"
       },
       "Title": "Project One Owners",
       "Description": "Members of this group have full control on the Project One site"
    }

    Build the XAML File

    I'm going to assume that you know how the basics of how to build custom workflow activities for SharePoint in Visual Studio 2012 - if you don't, take a look at my previous post. As I did last time, I'll start by defining the arguments for the workflow activity:


    In this case, I want the consumer of the workflow activity to provide a title and a description for the new group - that's all the information we need. The workflow activity will return the integer ID and the login name of the new group - the consumer might need one or the other, depending on what they want to do after creating a group. We'll also return the response status code returned by the call to the REST API, to help out the activity consumer in the event that something goes wrong.

    Next, I'll define the variables I want to use within my activity:


    In practice, you're probably not going to know all the variables you need when you start developing a workflow activity. However, if you're replicating these steps to create your own activity, it's probably easier to define them all up front.

    We can now start building the activity by dragging child activities from the toolbox onto the designer surface. The finished activity looks like this:


    As you can see, the activity consists of seven child activities. Let's run through each of these in turn.

    Step 1: Get current site URL

    In this activity, we want to get the URL of the current site collection. I've used a LookupWorkflowContextProperty activity to do this. In the activity properties, I'm looking up the current site URL and assigning it to the siteUrl variable.


    Step 2: Build the REST URL

    In this activity, we want to build on the site URL to form a REST endpoint for our request. I've used an Assign activity to do this. In the activity properties, I'm concatenating the site URL and the site-relative REST endpoint, and assigning the result to the restUrl variable.


    Step 3: BuildDynamicValue (jsonRequest)

    In this activity, we build the JSON body for our REST request. I've used a BuildDynamicValue activity to do this.


    To define the properties in the jsonRequest variable, click the ellipsis in the Properties row. This enables you to provide a set of key/value pairs:


    Notice the Entity Type dropdown at the top of the dialog box. This doesn't change the structure of the variable you're creating in any way - it's a convenience tool that enables you to select your Path values from a list, rather than typing them manually. As we covered last time, you can use XPath notation (e.g. "__metadata/type") to add nested values to the variable.

    Step 4: Call the REST API method

    We've now set all the variable values we need, so we're ready to call the REST method. I've used the HttpSend activity to do this. You can configure every aspect of the request through the activity properties pane:


    In this case, I've:
    • Set the HTTP Method to POST.
    • Set the content of the request to the value of our jsonRequest variable.
    • Set the Uri for the request to the value of our restUrl variable.
    • Assigned the response body to the responseContent variable (this is a DynamicValue instance, because we're expecting a JSON response).
    • Assigned the response headers to the responseHeaders variable (again, a DynamicValue instance).
    • Assigned the response status code to the responseStatusCode variable (an HttpStatusCode enumeration value).
    The other thing you need to do here is to configure the request headers for the service call. To do this, click the ellipsis in the RequestHeaders row. This enables you to define your request headers as key/value pairs:


    Step 5: Assign responseStatusCodeOut

    At this point in the execution of our workflow activity, we've called the REST API method and a new group has hopefully been created. Now all we need to do is extract any information we need from the HTTP response. In this Assign task, I'm taking the responseStatusCode variable, converting it to a string, and assigning it to the responseStatusCodeOut argument. As I mentioned last time, SharePoint Designer doesn't like complex types like HttpStatusCode and DynamicValue. If you want to return information to SharePoint Designer, you need to convert your properties to an SPD-friendly type. In this case, we simply call the ToString method on our responseStatusCode variable and assign it to the String-based responseStatusCodeOut argument:


    Step 6: Get new group ID

    We want to return the integer ID and the login name of the new group to consumers of our workflow activity. We can get both of these properties from the JSON response returned by the REST API. If you look at the response in Fiddler (or any other web debugger), it should resemble the following:
    {"d":{
       "__metadata":{
          "id":"http://team.jason.net/_api/Web/SiteGroups/GetById(27)",
          "uri":"http://team.jason.net/_api/Web/SiteGroups/GetById(27)",
          "type":"SP.Group"
       },
       "Owner":{
          "__deferred":{
             "uri":"http://team.jason.net/_api/Web/SiteGroups/GetById(27)/Owner"
          }
       },
       "Users":{
          "__deferred":{
             "uri":"http://team.jason.net/_api/Web/SiteGroups/GetById(27)/Users"
          }
       },
       "Id":27,
       "IsHiddenInUI":false,
       "LoginName":"Project One Owners",
       "Title":"Project One Owners",
       "PrincipalType":8,
       "AllowMembersEditMembership":false,
       "AllowRequestToJoinLeave":false,
       "AutoAcceptRequestToJoinLeave":false,
       "Description":"Members of this group have full control on the Project One site",
       "OnlyAllowMembersViewMembership":true,
       "OwnerTitle":"Administrator",
       "RequestToJoinLeaveEmailSetting":null
    }}

    Now that we know what the response will look like, we can use GetDynamicValue<T> activities to extract the properties we want from the JSON response. To get the group ID, we use specify the path "d/Id":


    Step 7: Get new group login name

    Similarly, we can use a GetDynamicValue<T> activity to get the login name of the new group. In this case, the path is "d/LoginName":


    Build the Actions File

    Our last task is to edit the .actions4 file so we can use the Create Group activity in SharePoint Designer. To recap, the .actions4 file defines the sentence that appears in SPD when you add the activity to a workflow, together with the arguments defined in the workflow activity. (For a more detailed explanation of how it works, see the previous post.)

    In this case, the .actions4 file should resemble the following:
    <Action Name="Create Group" ClassName="SiteManagementActivities.CreateGroup" Category="Site Management" AppliesTo="all">
      <RuleDesigner Sentence="Create a site group named %1 with description %2 (Output: %3 %4 %5)">   
        <FieldBind  Field="groupTitle" Text="Group Title" Id="1" />
        <FieldBind  Field="groupDescription" Text="Group Description" Id="2" />   
        <FieldBind  Field="groupIdOut" Text="Group ID" Id="3" />
        <FieldBind  Field="responseStatusCodeOut" Text="Response Status Code" Id="4" />
        <FieldBind  Field="loginNameOut" Text="Group Login Name" Id="5" />
      </RuleDesigner>
      <Parameters>
        <Parameter Type="System.String, mscorlib" Direction="In" Name="groupTitle" />
        <Parameter Type="System.String, mscorlib" Direction="In" Name="groupDescription" />   
        <Parameter Type="System.Int32, mscorlib" Direction="Out" Name="groupIdOut" />
        <Parameter Type="System.String, mscorlib" Direction="Out" Name="responseStatusCodeOut" />
        <Parameter Type="System.String, mscorlib" Direction="Out" Name="loginNameOut" />
      </Parameters>
    </Action>

    And that concludes how to build a workflow activity that creates a SharePoint group. Next time, I'll take a look at how to set the owner of a group from a workflow activity.

    Custom Workflow Activity for Setting a SharePoint Group Owner

    $
    0
    0
    In my last couple of posts I've looked at building custom workflow activities to create sites and create groups in SharePoint 2013. In this post I'll walk you through how to build a workflow activity that changes the owner of a SharePoint group. This is slightly more challenging, as at the time of writing you cannot use the REST API to change the owner of a SharePoint group. Instead, you have to make a service call containing client-side object model (CSOM) XML. If I ever make it to San Diego, I owe Chris Givens several drinks for helping me figure out this approach and switching me on to the capabilities of CSOM XML.

    Note: this is part of a series of posts on building workflow activities to manage sites, groups, users and permissions. For a complete list of posts, together with a more detailed walkthrough of how to build a custom workflow activity and make it available in SharePoint Designer, start at the beginning.

    Fundamentals

    You can't currently use the REST API to set the owner of a SharePoint group (if you want the details, check out this forum post). However, you can set the owner of a SharePoint group by calling the client.svc service and including an XML body that specifies the changes you want to make. Whenever you use client-side code in SharePoint, the client-side object model serializes your changes into XML and sends them to the client.svc service. By watching these service calls in a web debugger such as Fiddler, you can figure out how the XML is structured. You can then build your own XML strings in a workflow activity and send them directly to the client.svc service.

    If you want to make a user the owner of a SharePoint group, you need to send a web request that resembles the following:

    Endpoint:
    {site collection URL}/_vti_bin/client.svc/ProcessQuery

    HTTP method:
    POST

    Headers:
    Content-Type: text/xml

    Body:
    <Request AddExpandoFieldTypeSuffix="true" SchemaVersion="15.0.0.0" LibraryVersion="15.0.0.0" ApplicationName=".NET Library" xmlns="http://schemas.microsoft.com/sharepoint/clientquery/2009">
      <Actions>
        <ObjectPath Id="1" ObjectPathId="2" />
        <SetProperty Id="3" ObjectPathId="4" Name="Owner">
          <Parameter ObjectPathId="2" />
        </SetProperty>
        <Method Name="Update" Id="5" ObjectPathId="4" />
      </Actions>
      <ObjectPaths>
        <Method Id="2" ParentId="6" Name="EnsureUser">
          <Parameters>
            <Parameter Type="String">{0}</Parameter>
          </Parameters>
        </Method>
        <Identity Id="4" Name="{1}:site:{2}:g:{3}" />
        <Identity Id="6" Name="{1}:site:{2}:web:{4}" />
      </ObjectPaths>
    </Request>

    Essentially, the request consists of two key elements:
    • The Actions element tells the service what you want to do.
    • The ObjectPaths element tells the service which objects you want to perform the actions on.
    The values of the integer IDs don't matter. When the client-side object model sends a request, it generates these values randomly for the purpose of tracking objects between requests. The important thing is that the ObjectPathId attribute values used throughout match the Id attribute values in the Identity elements, as this is how the service correlates your actions and your object paths.

    The XML body shown above includes various string placeholders that you'll need to replace before you call the service:
    • {0} is the user's login name.
    • {1} is the GUID of the SPObjectFactory class (always 740c6a0b-85e2-48a0-a494-e0f1759d4aa7).
    • {2} is the GUID of the current SPSite.
    • {3} is the integer ID of the group on which you want to set the owner.
    • {4} is the GUID of the SPWeb on which the user is listed (the root SPWeb will work).
    Plug in the placeholders and your request body should look something like this:
    <Request AddExpandoFieldTypeSuffix="true" SchemaVersion="15.0.0.0" LibraryVersion="15.0.0.0" ApplicationName=".NET Library" xmlns="http://schemas.microsoft.com/sharepoint/clientquery/2009">
      <Actions>
        <ObjectPath Id="1" ObjectPathId="2" />
        <SetProperty Id="3" ObjectPathId="4" Name="Owner">
          <Parameter ObjectPathId="2" />
        </SetProperty>
        <Method Name="Update" Id="5" ObjectPathId="4" />
      </Actions>
      <ObjectPaths>
        <Method Id="2" ParentId="6" Name="EnsureUser">
          <Parameters>
            <Parameter Type="String">i:0#.w|jason\andya</Parameter>
          </Parameters>
        </Method>
        <Identity Id="4" Name="740c6a0b-85e2-48a0-a494-e0f1759d4aa7:site:fd4535b0-25f5-4fcf-9a10-961ce1c30db3:g:27" />
        <Identity Id="6" Name="740c6a0b-85e2-48a0-a494-e0f1759d4aa7:site:fd4535b0-25f5-4fcf-9a10-961ce1c30db3:web:6e504370-0ea5-48b1-ad12-8f5d6cd23b23" />
      </ObjectPaths>
    </Request>

    Notice the format of the GUIDs - no braces or any other adornments. The object path names do get very hard to read, but so long as you get your format string right once you won't have to worry about them again.

    If you want to make another group (rather than a user) the owner of your group, you need to structure the XML body slightly differently:
    <Request AddExpandoFieldTypeSuffix="true" SchemaVersion="15.0.0.0" LibraryVersion="15.0.0.0" ApplicationName=".NET Library" xmlns="http://schemas.microsoft.com/sharepoint/clientquery/2009">
      <Actions>
        <SetProperty Id="1" ObjectPathId="2" Name="Owner">
          <Parameter ObjectPathId="3" />
        </SetProperty>
        <Method Name="Update" Id="4" ObjectPathId="2" />
      </Actions>
      <ObjectPaths>
        <Identity Id="2" Name="{0}:site:{1}:g:{2}" />
        <Identity Id="3" Name="{0}:site:{1}:g:{3}" />
      </ObjectPaths>
    </Request>

    In this case the placeholder values are as follows:
    • {0} is the GUID of the SPObjectFactory class (always 740c6a0b-85e2-48a0-a494-e0f1759d4aa7).
    • {1} is the GUID of the current SPSite.
    • {2} is the integer ID of the group on which you want to set the owner.
    • {3} is the integer ID of the group you want to make the owner.

    Build the XAML File

    At this point I'll assume that you know the basics of how to build custom workflow activities for SharePoint 2013 - if you want a more detailed walkthrough, take a look at my first post in this series. I'll start by defining the arguments:


    In this case, I need the consumer of the workflow activity to specify the ID of the group they want to update, together with the login name of the new group owner. The activity will return the status code from the web service response.

    Next, I'll define the variables I want to use within the activity:


    There's a lot going on here, so there are an exceptionally large number of variables. You'll see the purpose of each of these as we walk through the activity.

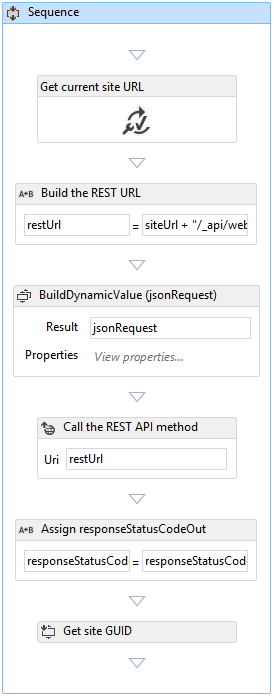
    The complete activity looks like this (in two halves, as it's too long to fit on the screen):


    In this case, we've got a total of twelve child activities. I'll walk through each of these in turn.

    Step 1: Get current site URL

    In this activity, we want to get the URL of the current site collection. I've used a LookupWorkflowContextProperty activity to do this. In the activity properties, I'm looking up the current site URL and assigning it to the siteUrl variable.


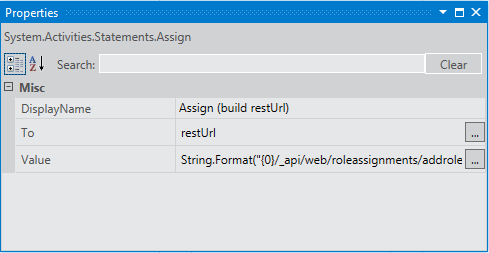
    Step 2: Assign (build service URL)

    In this activity, we want to build on the site URL to form a service endpoint for our request. I've used an Assign activity to do this. In the activity properties, I'm concatenating the site URL and the site-relative service endpoint, and assigning it to the serviceUrl variable.


    Step 3: LookupSPPrincipal

    In our workflow arguments, we're asking the activity consumer to provide a login name for the new group owner (which could be a user or a group). Here, I'm using a LookupSPPrincipal activity to resolve the login name. LookupSPPrincipal is a useful activity as it's fairly forgiving - the user can specify a login name, a display name or an email address, and the activity will resolve it and return the properties of the principal.


    The activity returns a JSON response body, which I'm assigning to the getPrincipalResponse DynamicValue variable.

    Step 4: Get Principal ID

    The JSON response returned by the LookupSPPrincipal activity resembles the following:
    {"d":{
       "ResolvePrincipalInCurrentContext":{
          "__metadata":{
             "type":"SP.Utilities.PrincipalInfo"
          },
          "Department":null,
          "DisplayName":"Project Four Owners",
          "Email":null,
          "JobTitle":null,
          "LoginName":"Project Four Owners",
          "Mobile":null,
          "PrincipalId":27,
          "PrincipalType":4,
          "SIPAddress":null
       }
    }}

    We can use GetDynamicValue<T> activities to retrieve the properties we're interested in from this response. If the new group owner is a SharePoint group, we'll need to specify the integer ID in our request, so in this activity we retrieve the PrincipalId property:


    Step 5: Get Principal Login Name

    If our new group owner is a user, we'll need to specify the login name in our request. So in this activity we retrieve the LoginName property:


    Step 6: Get Principal Type

    Before we can construct the XML body for our service request, we need to know whether the new group owner is a user or a SharePoint group. We can determine this from the value of the PrincipalType property, so in this activity we retrieve the PrincipalType property:


    Step 7: Get SPObjectFactory ID

    When we construct the XML body for our service request, we need to include the GUID of the SPObjectFactory class in all our object paths. As I mentioned earlier, in the current version of SharePoint this is always 740c6a0b-85e2-48a0-a494-e0f1759d4aa7. Here, I've created a simple helper activity that returns the SPObjectFactory ID. I encapsulated it in a helper activity in case the GUID changes at a later date.


    Step 8: Get Site Guid

    Our service request XML body must also include the ID of the site collection that contains our group and its new owner. Here, I've created a simple helper activity that returns the GUID ID of the current site collection:


    If you've got this far, you probably won't have any difficulty getting the site GUID. Essentially, you send a GET request to {site collection URL}/_api/site, and then retrieve the "d/Id" property from the response.

    Step 9: Get Web Guid

    If our new group owner is a user, our service request XML body must include the ID of the site (SPWeb) whose user information list contains the user (the root site will typically do it - the XML body includes an EnsureUser call that adds the user to the user information list if they're not on it already). Here, I've created a simple helper activity that returns the GUID ID of a specified site:


    Again, getting the GUID of an SPWeb is pretty straightforward - you send a GET request to {site URL}/_api/web, and then retrieve the "d/Id" property from the response.

    Step 10: Switch<Int32>

    Things get a little bit messy at this point. We need to construct a different XML body for our service request depending on whether the new group owner is a user or a group. To do this, I've used a Switch<T> activity that switches on the value of the PrincipalType property. This is an SPPrincipalType enumeration value, where:
    • A value of 1 represents a SharePoint user.
    • A value of 2 represents a distribution list.
    • A value of 4 represents a security group.
    • A value of 8 represents a SharePoint group.

    Case 8

    If the value of the principalType variable is 8, we need to construct an XML body that specifies another SharePoint group as the new owner of our group:


    Notice that if you want to add more than one activity within a case, you need to encapsulate them within a Sequence activity. First, we create a format string with placeholders for our GUIDs, group IDs, etc:


    The value here is the XML body I showed you at the start of this article, with whitespace removed and quotation marks escaped - here it is for copy-and-paste convenience:
    @"<Request AddExpandoFieldTypeSuffix=""true"" SchemaVersion=""15.0.0.0"" LibraryVersion=""15.0.0.0"" ApplicationName="".NET Library"" xmlns=""http://schemas.microsoft.com/sharepoint/clientquery/2009""><Actions><SetProperty Id=""1"" ObjectPathId=""2"" Name=""Owner""><Parameter ObjectPathId=""3"" /></SetProperty><Method Name=""Update"" Id=""4"" ObjectPathId=""2"" /></Actions><ObjectPaths><Identity Id=""2"" Name=""{0}:site:{1}:g:{2}"" /><Identity Id=""3"" Name=""{0}:site:{1}:g:{3}"" /></ObjectPaths></Request>"

    Notice that you do need to escape the quotation marks as shown - it appears that the service does not like attribute values in single quotes ('). Next we plug the values into our format string to generate our XML body:


    The value here is as follows:
    String.Format(xmlFormatString, factoryGuid.ToString(), siteGuid.ToString(), groupId.ToString(), principalId.ToString())

    Case 1

    If the value of the principalType variable is 1, we need to construct an XML body that specifies another SharePoint group as the new owner of our group:


    As you can see, the activities in this case are the same as the activities in the previous case. However, the values reflect the syntax required to make a user, rather than another group, the owner of our group. You need to set the XML format string to the following:
    @"<Request AddExpandoFieldTypeSuffix=""true"" SchemaVersion=""15.0.0.0"" LibraryVersion=""15.0.0.0"" ApplicationName="".NET Library"" xmlns=""http://schemas.microsoft.com/sharepoint/clientquery/2009""><Actions><ObjectPath Id=""1"" ObjectPathId=""2"" /><SetProperty Id=""3"" ObjectPathId=""4"" Name=""Owner""><Parameter ObjectPathId=""2"" /></SetProperty><Method Name=""Update"" Id=""5"" ObjectPathId=""4"" /></Actions><ObjectPaths><Method Id=""2"" ParentId=""6"" Name=""EnsureUser""><Parameters><Parameter Type=""String"">{0}</Parameter></Parameters></Method><Identity Id=""4"" Name=""{1}:site:{2}:g:{3}"" /><Identity Id=""6"" Name=""{1}:site:{2}:web:{4}"" /></ObjectPaths></Request>"

    Set the value of your XML body to the following:
    String.Format(xmlFormatString, principalLoginName, factoryGuid.ToString(), siteGuid.ToString(), groupId.ToString(), webGuid.ToString())

    Case 4

    This case is required to address an idiosyncrasy in the LookupSPPrincipal activity. When you look up a SharePoint group, it appears to return a principal type of 4 rather than the expected 8. To deal with this, I've simply copied the contents of Case 8 into Case 4.

    Step 11: HttpSend

    At this point, you've set all the variable values you need in order to call the web service. The HttpSend activity is configured as follows:


    This is pretty straightforward - you're sending a POST request containing your XML body to the service URL you defined near the start of the activity. The only other thing you need to do at this point is to add a Content-Type header:


    Step 12: Assign

    In this final task, we're simply converting the response status code into an SPD-friendly format and assigning it to an argument:


    Build the Actions File

    Our last task is to edit the .actions4 file so we can use the Set Group Owner activity in SharePoint Designer. To recap, the .actions4 file defines the sentence that appears in SPD when you add the activity to a workflow, together with the arguments defined in the workflow activity. If you've made it this far, this step should be pretty straightforward (For a more detailed explanation of what's going on in the .actions4 file, refer to the first post in this series.)

    In this case, the .actions4 file should resemble the following:
    <Action Name="Set Group Owner" ClassName="SiteManagementActivities.SetGroupOwner" Category="Site Management" AppliesTo="all">
      <RuleDesigner Sentence="Make %1 the owner of the group %2 (Output: %3)">
        <FieldBind  Field="ownerLoginName" Text="Principal Login Name" Id="1" />
        <FieldBind  Field="groupId" Text="Group ID" Id="2" />
        <FieldBind  Field="responseStatusCodeOut" Text="Response Status Code" Id="3" />
      </RuleDesigner>
      <Parameters>
        <Parameter Type="System.String, mscorlib" Direction="In" Name="ownerLoginName" />
        <Parameter Type="System.Int32, mscorlib" Direction="In" Name="groupId" />
        <Parameter Type="System.String, mscorlib" Direction="Out" Name="responseStatusCodeOut" />   
      </Parameters>
    </Action>

    And that concludes how to build a workflow activity that sets the owner of a SharePoint group. It's not pretty, but it works a treat.


    Custom Workflow Activity for Setting the Associated Members Group of a SharePoint Site

    $
    0
    0
    So far in this series of posts I've looked at building custom workflow activities to create sites, create groups, and set group owners in SharePoint 2013. In this post I'll walk you through how to build a workflow activity that sets the associated members group of a SharePoint site. You can use the same approach to set the associated owners group and the associated visitors group as required.

    Note: this is part of a series of posts on building workflow activities to manage sites, groups, users and permissions. For a complete list of posts, together with a more detailed walkthrough of how to build a custom workflow activity and make it available in SharePoint Designer, start at the beginning.

    Fundamentals

    You can't currently use the REST API to set the associated groups for a SharePoint site. The REST API includes endpoints for each property:
    • /_api/web/associatedownergroup
    • / _api/web/associatedmembergroup
    • /_api/web/associatedownergroup
    However, although these work fine for GET requests, there doesn't currently appear to be any way of changing these properties. As an alternative, you can set associated groups by calling the client.svc service and including an XML body that specifies the changes you want to make. (For a bit more background information on CSOM XML, take a look at my previous post.)

    If you want to set the associated members group for a SharePoint site, you need to send a web request that resembles the following:

    Endpoint:
    {web URL}/_vti_bin/client.svc/ProcessQuery

    HTTP method:
    POST

    Headers:
    Content-Type: text/xml

    Body:
    <Request AddExpandoFieldTypeSuffix="true" SchemaVersion="15.0.0.0" LibraryVersion="15.0.0.0" ApplicationName=".NET Library" xmlns="http://schemas.microsoft.com/sharepoint/clientquery/2009">
       <Actions>
          <SetProperty Id="1" ObjectPathId="2" Name="AssociatedMemberGroup">
             <Parameter ObjectPathId="3" />
          </SetProperty><Method Name="Update" Id="4" ObjectPathId="2" />
       </Actions>
       <ObjectPaths>
          <Identity Id="2" Name="{0}:site:{1}:web:{2}" />
          <Identity Id="3" Name="{0}:site:{1}:g:{3}" />
       </ObjectPaths>
    </Request>

    Again - for a more detailed explanation of the elements in these CSOM XML requests, take a look at the previous post.

    The XML body shown above includes various string placeholders that you'll need to replace before you call the service:
    • {0} is the GUID of the SPObjectFactory class (always 740c6a0b-85e2-48a0-a494-e0f1759d4aa7).
    • {1} is the GUID of the current SPSite (i.e. the SPSite that contains your SPWeb).
    • {2} is the GUID of the SPWeb on which you want to set the property.
    • {3} is the integer ID of the SharePoint group you want to associate with the site.
    If you want to set the associated owners or visitors group, you can use essentially the same XML body - simply replace the text AssociatedMemberGroup with AssociatedOwnerGroup or AssociatedVisitorGroup.

    Build the XAML File

    At this point I'll assume that you know the basics of how to build custom workflow activities for SharePoint 2013 - if you want a more detailed walkthrough, take a look at my first post in this series. I'll start by defining the arguments:


    In this case, I need the consumer of the workflow activity to specify the URL of the site they want to modify, together with the integer ID of the group they want to associate with the site. The activity will return the status code from the web service response.

    Next, I'll define the variables I want to use within the activity:


    You'll see the purpose of each of these as we walk through the activity. The complete activity looks like this:


    In this case, we've got a total of eight child activities. I'll walk through each of these in turn.

    Step 1: Assign (build service URL)

    In this activity, we want to build a service endpoint for our request. I've used an Assign activity to do this. In the activity properties, I'm concatenating the site (SPWeb) URL provided by activity consumer and the site-relative service endpoint, and assigning it to the serviceUrl variable.


    Step 2: Assign (define xmlFormatString)

    In this activity we build a format string for our XML body with placeholders for our GUIDs and group IDs. I've used an Assign activity to do this:


    The value here is the XML body I showed you at the start of this article, with whitespace removed and quotation marks escaped:
    @"<Request AddExpandoFieldTypeSuffix=""true"" SchemaVersion=""15.0.0.0"" LibraryVersion=""15.0.0.0"" ApplicationName="".NET Library"" xmlns=""http://schemas.microsoft.com/sharepoint/clientquery/2009""><Actions><SetProperty Id=""1"" ObjectPathId=""2"" Name=""AssociatedMemberGroup""><Parameter ObjectPathId=""3"" /></SetProperty><Method Name=""Update"" Id=""4"" ObjectPathId=""2"" /></Actions><ObjectPaths><Identity Id=""2"" Name=""{0}:site:{1}:web:{2}"" /><Identity Id=""3"" Name=""{0}:site:{1}:g:{3}"" /></ObjectPaths></Request>"

    Step 3: Get SPObjectFactory ID

    When we construct the XML body for our service request, we need to include the GUID of the SPObjectFactory class in all our object paths. As I mentioned earlier, in the current version of SharePoint this is always 740c6a0b-85e2-48a0-a494-e0f1759d4aa7. Here, I've created a simple helper activity that returns the SPObjectFactory ID. I encapsulated it in a helper activity in case the GUID changes at a later date.


    Step 4: Get Site Guid

    Our service request XML body must also include the ID of the site collection that contains our group and its new owner. Here, I've created a simple helper activity that returns the GUID ID of the current site collection:


    If you've got this far, you probably won't have any difficulty getting the site GUID. Essentially, you send a GET request to {site collection URL}/_api/site, and then retrieve the "d/Id" property from the response.

    Step 5: Get Specified Web Guid

    Our service request XML body must include the ID of the site (SPWeb) you want to modify. Bear in mind that this may not be the current SPWeb - if you're building a workflow that creates and configures a subsite, your workflow is likely to be running on the root site of the site collection, whereas the subsite you're configuring will be elsewhere within the site collection. Here, I've created a simple helper activity that returns the GUID ID of a specified SPWeb:


    The activity takes the web URL provided by the activity consumer and returns the ID of the web. Again, getting the GUID of an SPWeb is pretty straightforward - you send a GET request to {site URL}/_api/web, and then retrieve the "d/Id" property from the response.

    Step 6: Assign (populates xmlBody)

    In this activity, we plug our variable values into our format string. This gives us a complete XML body to the web service:


    The value here is as follows:
    String.Format(xmlFormatString, factoryGuid.ToString(), siteGuid.ToString(), webGuid.ToString(), groupId.ToString())

    Step 7: HttpSend

    At this point, you've set all the variable values you need in order to call the web service. The HttpSend activity is configured as follows:


    This is pretty straightforward - you're sending a POST request containing your XML body to the service URL you defined near the start of the activity. The only other thing you need to do at this point is to add a Content-Type header:


    Step 8: Assign responseStatusCodeOut

    In this final task, we're simply converting the response status code into an SPD-friendly format and assigning it to an argument:


    Build the Actions File

    The last task is to edit the .actions4 file so we can use the Set Associated Members Group activity in SharePoint Designer. To recap, the .actions4 file defines the sentence that appears in SPD when you add the activity to a workflow, together with the arguments defined in the workflow activity. If you've made it this far, this step should be pretty straightforward (For a more detailed explanation of what's going on in the .actions4 file, refer to the first post in this series.)

    In this case, the .actions4 file should resemble the following:
    <Action Name="Set Associated Members Group" ClassName="SiteManagementActivities.SetMembersGroup" Category="Site Management" AppliesTo="all">
      <RuleDesigner Sentence="Make group %1 the associated members group of the SPWeb at %2 (Output: %3)">
        <FieldBind  Field="groupId" Text="Group ID" Id="1" />
        <FieldBind  Field="webUrl" Text="Web URL" Id="2" />
        <FieldBind  Field="responseStatusCodeOut" Text="Response Status Code" Id="3" />
      </RuleDesigner>
      <Parameters>
        <Parameter Type="System.Int32, mscorlib" Direction="In" Name="groupId" />
        <Parameter Type="System.String, mscorlib" Direction="In" Name="webUrl" />
        <Parameter Type="System.String, mscorlib" Direction="Out" Name="responseStatusCodeOut" />
      </Parameters>
    </Action>

    And that concludes how to build a workflow activity that sets the associated members group of a SharePoint site. I hope somebody out there finds it useful.

    Custom Workflow Activity for Granting Permissions on a SharePoint Site

    $
    0
    0
    In this post I'll take a look at how to build a custom workflow activity in Visual Studio 2012 that grants permissions on a SharePoint 2013 site to a user or group.

    Note: this is part of a series of posts on building workflow activities to manage sites, groups, users and permissions. For a complete list of posts, together with a more detailed walkthrough of how to build a custom workflow activity and make it available in SharePoint Designer, start at the beginning.

    Fundamentals

    You can use the REST API to grant permissions to a SharePoint principal (i.e. a user or group). There are two stages to the process.

    Stage 1: Get the Role Definition ID

    Before you can grant permissions to a principal, you need to know the ID of the role definition (i.e. the permission level) you want to assign to the principal. Built-in role definitions have a ten-digit ID value. For example:
    • The ID of the Full Control role definition is 1073741829.
    • The ID of the Contribute role definition is 1073741827.
    • The ID of the Read role definition is 1073741826.
    However, maintaining a list of these IDs is pretty inconvenient. Also, if you want to use a non-standard role definition, you may not know the ID. When you're building a workflow, it's much easier if you can specify the name of the role definition you want rather than the integer ID. Fortunately, getting a role definition by name is straightforward with the REST API - you need to send a web request that resembles the following:

    Endpoint:
    {site collection URL}/_api/web/roledefinitions/getbyname('{name of role definition}')

    HTTP method:
    GET

    Headers:
    Accept: application/json; odata=verbose
    Content-Type: application/json; odata=verbose

    The REST service will send a response that resembles the following:
    {"d":{
       "__metadata":{
          "id":"http://team.jason.net/_api/Web/RoleDefinitions(1073741829)",
          "uri":"http://team.jason.net/_api/Web/RoleDefinitions(1073741829)",
          "type":"SP.RoleDefinition"
       },
       "BasePermissions":{
          "__metadata":{
             "type":"SP.BasePermissions"
          },
          "High":"2147483647",
          "Low":"4294967295"
       },
       "Description":"Has full control.",
       "Hidden":false,
       "Id":1073741829,
       "Name":"Full Control",
       "Order":1,
       "RoleTypeKind":5
    }}

    As you can see, you can get the ID value you want by retrieving the "d/Id" property from this response.

    Stage 2: Add a New Role Assignment

    The REST API includes an endpoint on every securable object that enables you to add a role assignment by specifying the integer principal ID and the integer role definition ID. Unlike server-side or client-side programming, you don't need to worry about creating role definition bindings - the service will take care of this for you behind the scenes. To add a new role assignment on an SPWeb, you need to send a web request that resembles the following:

    Endpoint:
    {site collection URL}/_api/web/roleassignments/addroleassignment(principalid={principal ID}, roledefid={role definition ID})

    HTTP method:
    POST

    Headers:
    Not required

    Body:
    Empty

    To create a workflow activity that grants permissions, I first built a utility activity (Get Role Definition ID) that retrieves the ID value of a role definition with a specified name. I then consume this utility activity within a primary activity (Grant Web Permissions) that adds a new role assignment to the specified site. I'll run through both of these activities in the rest of this post.

    The "Get Role Definition ID" Activity

    I'm now on post number five of this series of posts on creating workflow activities, so I'll keep this as concise as possible - please refer back to earlier posts if you want a bit more detail on the process. I'll start by defining the arguments for the Get Role Definition ID activity:


    In this case, I want the consumer of the workflow activity to provide the name of the role definition. The workflow activity will return the corresponding ID of the role definition, together with the status code returned by the REST service.

    Next, I'll define the variables I want to use within my activity:


    Here, I've got a variable to store the URL of the current site collection, a variable to store the REST endpoint we want to use, and variables to store the headers, content and status code returned by the service call.

    The complete activity looks like this:


    Let's take a brief look at each of these child activities - I've covered these activity types in detail in previous posts, so I'll try to keep this concise.

    Get Current Site URL

    The first thing we need to do is to grab the URL of the current site and store it in our siteUrl variable. I've used a LookupWorkflowContextProperty activity to do this:


    Build the REST URL

    The next task is to build the URL for our REST service call, using our site URL, the site-relative REST endpoint, and the role definition name provided by the activity consumer:


    HttpSend

    Next, we use an HttpSend activity to make the REST API call:


    Assign responseStatusCodeOut

    In this activity, we convert the response status code returned by the REST service into a SharePoint Designer-friendly string format:


    Get ID from Response

    In this final task, we use a GetDynamicValue<T> activity to extract the ID of the role definition from the JSON response content returned by the REST service:


    Build the Actions File

    To finish off the Get Role Definition ID activity, we need to edit the .actions4 file. In this case, the file should resemble the following:
    <Action Name="Get Role Definition ID" ClassName="SiteManagementActivities.GetRoleDefinitionId" Category="Site Management" AppliesTo="all">
      <RuleDesigner Sentence="Get the integer ID of the role definition %1 (Output: %2 %3)">
        <FieldBind  Field="roleDefinitionName" Text="Role Definition Name" Id="1" />
        <FieldBind  Field="roleDefIdOut" Text="Role Definition ID" Id="2" />
        <FieldBind  Field="responseStatusCodeOut" Text="Response Status Code" Id="3" />
      </RuleDesigner>
      <Parameters>
        <Parameter Type="System.String, mscorlib" Direction="In" Name="roleDefinitionName" />
        <Parameter Type="System.Int32, mscorlib" Direction="Out" Name="roleDefIdOut" />
        <Parameter Type="System.String, mscorlib" Direction="Out" Name="responseStatusCodeOut" />
      </Parameters>
    </Action>

    Now the Get Role Definition ID helper activity is complete, we can build our primary activity that makes use of it.

    To use this helper activity within another activity, we need it to show up in the Visual Studio toolbox. The toolbox gets its activities from the SharePoint site you're using for debugging. As such, you'll need to deploy this activity (Start Without Debugging) and then close and reopen Visual Studio. You should then see the activity in the toolbox when you're building your next activity.

    The "Grant Web Permissions" Activity

    In this activity, we're going to add a role assignment to the web specified by the activity consumer. The role assignment will specify the integer ID of the principal to whom we want to grant permissions (could be a user or a SharePoint group), together with the integer ID of the permission level we want to assign. As before, let's start by defining the arguments:


    In this case, we need the activity consumer to provide:
    • The URL of the web on which they want to grant permissions.
    • The login name (title or email will also work) of the principal to whom they want to grant permissions.
    • The name (e.g. "Full Control", "Contribute", "Read") of the permission level (aka role definition) they want to assign.
    The workflow activity will return the response status code returned by the REST API call.

    Next, let's define our activity variables:


    Here we've got a variable to store our REST endpoint, variables to store the integer IDs for the principal and the role definition, and variables to store responses from the REST API call.

    The complete activity looks like this:


    Let's take a brief look at each of these child activities.

    Get Principal ID

    The first thing we need to do is to get the integer ID of the principal to whom we want to grant permissions, using the login name provided by the activity consumer. I've used a LookupSPPrincipalId activity to do this:


    Get Role Definition ID

    Next, we need to get the integer ID of the role definition we want to assign to the principal, using the permission level name provided by the activity consumer. Here, I've used the GetRoleDefinitionId helper activity that we defined in the first half of this post:


    Assign (build restUrl)

    We've now got all the information we need to build our REST URL. I've used an Assign activity to do this:


    The full value for the restUrl variable is as follows:
    String.Format("{0}/_api/web/roleassignments/addroleassignment(principalid={1}, roledefid={2})", webUrl, principalId, roleDefinitionId)

    HttpSend

    Next, we send our REST request to the server:


    Here, we're sending an HTTP POST request with an empty body to the REST URL we defined in the previous step. We're also assigning the headers, content and status code returned by the service to local variables. At this stage you'll also need to configure your request headers by clicking the ellipsis button in the RequestHeaders row:


    Assign responseStatusCodeOut

    In this final activity, we convert the response status code returned by the REST service into a SharePoint Designer-friendly string format as before:


    Build the Actions File

    To finish off the Grant Web Permissions activity, we need to edit the .actions4 file. In this case, the file should resemble the following:
    <Action Name="Grant Web Permissions" ClassName="SiteManagementActivities.GrantWebPermissions" Category="Site Management" AppliesTo="all">
      <RuleDesigner Sentence="Grant the permission level %1 to user or group %2 on the SPWeb %3 (Output: %4)">
        <FieldBind  Field="permissionLevel" Text="Permission Level Name" Id="1" />
        <FieldBind  Field="principalLoginName" Text="Principal Login Name" Id="2" />
        <FieldBind  Field="webUrl" Text="SPWeb URL" Id="3" />
        <FieldBind  Field="responseStatusCodeOut" Text="Response Status Code" Id="4" />
      </RuleDesigner>
      <Parameters>
        <Parameter Type="System.String, mscorlib" Direction="In" Name="permissionLevel" />
        <Parameter Type="System.String, mscorlib" Direction="In" Name="principalLoginName" />
        <Parameter Type="System.String, mscorlib" Direction="In" Name="webUrl" />
        <Parameter Type="System.String, mscorlib" Direction="Out" Name="responseStatusCodeOut" />
      </Parameters>
    </Action>

    Once you've deployed the solution, activated the feature and cleared the SharePoint Designer cache, the Grant Web Permissions activity should be available for use in SharePoint Designer workflows. Behind the scenes, the Grant Web Permissions activity will make use of the Get Role Definition ID helper activity to get the integer ID for a specified role definition name.

    Custom Workflow Activity for Breaking List Role Inheritance

    $
    0
    0
    In this post I'll show you how to build a custom workflow activity in Visual Studio 2012 that breaks role inheritance on a SharePoint 2013 list or library.

    Note: this is part of a series of posts on building workflow activities to manage sites, groups, users and permissions. For a complete list of posts, together with a more detailed walkthrough of how to build a custom workflow activity and make it available in SharePoint Designer, start at the beginning.

    Fundamentals

    This is nice and straightforward. You can use the REST API to break role inheritance on a SharePoint list or library. You need to send a web request that resembles the following:

    Endpoint:
    {site collection URL}/_api/web/lists/getByTitle('{List title}')/breakroleinheritance(copyRoleAssignments={true/false}, clearSubscopes={true/false})

    HTTP method:
    POST

    You can leave the request body empty, and you don't need to add any request headers if you're doing this from a workflow activity. (If you're doing it from another client platform, you'll need an X-RequestDigest header).

    Like it's server-side equivalent, the BreakRoleInheritance method accepts two Boolean arguments:
    • CopyRoleAssignments. Set this to true if you want to copy existing role assignments from the parent object before you break inheritance; otherwise false.
    • ClearSubscopes. Set this to true if you want to clear existing permissions from children of the current object before you break inheritance; otherwise false.

    Build the XAML File

    This is post number six of this series of posts on creating workflow activities, so I'll keep this concise - please refer back to earlier posts if you want a bit more detail on the process. As usual, I'll start by defining the arguments for the Break List Role Inheritance activity:


    As you can see, in this case we need four pieces of information from the activity consumer:
    • The URL of the web that contains the list or library.
    • The title of the list or library.
    • A Boolean value for the CopyRoleAssignments argument.
    • A Boolean value for the ClearSubscopes argument.
    The workflow activity will return the status code returned by the REST service.

    Next, I'll define the variables I want to use within my activity:


    Here, I've got a variable to store the REST endpoint we want to use together with variables to store the headers, content and status code returned by the service call.

    Note: I assign the response headers and response content to workflow variables through force of habit. If you're not planning to use them, you don't need to create or assign them.

    The complete activity looks like this:


    Assign (build REST URL)

    The first task is to build the URL for our REST service call, using the information provided by the activity consumer (i.e. our argument values):


    The full value for the restUrl variable is as follows:
    String.Format("{0}/_api/web/lists/getByTitle('{1}')/breakroleinheritance(copyRoleAssignments={2}, clearSubscope={3})", webUrl, listTitle, copyRoleAssignments.ToString().ToLower(), clearSubscopes.ToString().ToLower())

    Notice that you need to convert the Boolean argument values to lower-case strings. If the strings are not lower-case, the REST service will throw an invalid argument exception.

    HttpSend

    Next, we send our REST request to the server:


    Here, we're sending an HTTP POST request with an empty body to the REST URL we defined in the previous step. I've also assigned the headers, content and status code returned by the service to local variables - however, as I mentioned earlier, you only need to do this if you plan to make use of these values in some way.

    Assign responseStatusCodeOut

    In this final activity, we convert the response status code returned by the REST service into a SharePoint Designer-friendly string format:


    Build the Actions File

    To finish off the Break List Role Inheritance activity, we need to edit the .actions4 file. In this case, the file should resemble the following:
    <Action Name="Break Role Inheritance On List" ClassName="SiteManagementActivities.BreakListRoleInheritance" Category="Site Management" AppliesTo="all">
      <RuleDesigner Sentence="Break role inheritance on %1 on the web %2. Copy existing role assignments? %3. Clear subscopes? %4. (Output: %5) ">
        <FieldBind  Field="listTitle" Text="List Title" Id="1" />
        <FieldBind  Field="webUrl" Text="SPWeb URL" Id="2" />
        <FieldBind  Field="copyRoleAssignments" Text="Yes/No" Id="3" />
        <FieldBind  Field="clearSubscopes" Text="Yes/No" Id="4" />
        <FieldBind  Field="responseStatusCodeOut" Text="Response Status Code" Id="5" />
      </RuleDesigner>
      <Parameters>
        <Parameter Type="System.String, mscorlib" Direction="In" Name="listTitle" />
        <Parameter Type="System.String, mscorlib" Direction="In" Name="webUrl" />
        <Parameter Type="System.Boolean, mscorlib" Direction="In" Name="copyRoleAssignments" />
        <Parameter Type="System.Boolean, mscorlib" Direction="In" Name="clearSubscopes" />
        <Parameter Type="System.String, mscorlib" Direction="Out" Name="responseStatusCodeOut" />
      </Parameters>
    </Action>

    When you've deployed the solution, activated the feature and cleared the SharePoint Designer cache, the Break List Role Inheritance activity should be available for use in SharePoint Designer workflows. In my next post, I'll show you how to assign new permissions to the list or library.

    Custom Workflow Activity for Granting Permissions on a SharePoint List

    $
    0
    0
    In this post I'll show you how to build a custom workflow activity in Visual Studio 2012 that grants permissions on a SharePoint 2013 list or library to a user or group.

    Note: this is part of a series of posts on building workflow activities to manage sites, groups, users and permissions. For a complete list of posts, together with a more detailed walkthrough of how to build a custom workflow activity and make it available in SharePoint Designer, start at the beginning.

    Fundamentals

    You can use the REST API to set permissions on any securable object in SharePoint 2013. However, the object on which you're trying to set permissions must not inherit permissions from a parent object. In the case of lists and libraries, this typically means that you must break permission inheritance before you attempt to set permissions. I described how to create a workflow activity that breaks permission inheritance in a previous post.

    Once you've broken any permission inheritance, you grant permissions by adding a new role assignment to the securable object. You can use the REST API to do this. In the case of a list or library, you need to send a web request that resembles the following:

    Endpoint:
    {site collection URL}/_api/web/lists/getByTitle('{List title}')/roleassignments/addroleassignment(principalid={principal ID}, roledefid={role definition ID})

    HTTP method:
    POST

    Headers:
    Not required

    Body:
    Empty

    Note: I described how to retrieve the integer role definition ID for a given role definition name (i.e. permission level) in a previous post, when I looked at granting permissions on SharePoint sites. In this case, I'm going to use the same Get Role Definition ID helper activity that I described in the previous post.

    Build the XAML File

    This is the latest in a long series of posts on creating workflow activities, so I'll keep this concise - please refer back to earlier posts if you want a bit more detail on the mechanics of building custom workflow activities for SharePoint 2013. As usual, I'll start by defining the arguments for my Grant List Permissions activity:


    In this case, I need the consumer of the activity to provide:
    • The URL of the web that contains the list or library.
    • The title of the list or library.
    • The name of the permission level they want to assign.
    • The login name (title or email will also work) of the principal to whom they want to grant permissions.
    The workflow activity will return the response status code returned by the REST API call.

    Next, we define our activity variables:


    Here we've got a variable to store our REST endpoint, variables to store the integer IDs for the principal and the role definition, and variables to store responses from the REST API call.

    The complete activity looks like this:


    Let's take a brief look at each of these child activities.

    Get Principal ID

    Our first task is to get the integer ID of the principal to whom we want to grant permissions, using the login name provided by the activity consumer. I've used a LookupSPPrincipalId activity to do this:


    Get Role Definition ID

    Next, we need to get the integer ID of the role definition we want to assign to the principal, using the permission level name provided by the activity consumer. Here, I've used a custom helper activity named GetRoleDefinitionId:


    Essentially, this helper activity uses a REST query to get the integer role definition ID for a specified role definition name. I described how to create this helper activity in a previous post, Custom Workflow Activity for Granting Permissions on a SharePoint Site.

    Assign (build restUrl)

    We've now got all the information we need to build our REST URL. I've used an Assign activity to do this:


    The full value for the restUrl variable is as follows:
    String.Format("{0}/_api/web/lists/getByTitle('{1}')/roleassignments/addroleassignment(principalid={2}, roledefid={3})", webUrl, listTitle, principalId, roleDefinitionId)

    HttpSend

    The next task is to send our REST request to the server, using an HttpSend activity:


    Here, we're sending an HTTP POST request with an empty body to the REST URL we defined in the previous step. We're also assigning the headers, content and status code returned by the service to local variables. As I've mentioned in previous posts, I tend to assign responses to local variables through force of habit - you don't need to create and assign these variables unless you're planning to extract information from the responses.

    At this stage you'll also need to configure your request headers by clicking the ellipsis button in the RequestHeaders row:


    Assign responseStatusCodeOut

    In this final activity, we convert the response status code returned by the REST service into a SharePoint Designer-friendly string format. Returning a response status code is optional - it won't affect the functionality of your activity, but it could be useful if the consumer of your activity wants to perform additional actions, such as sending an email, in the event that something goes wrong.


    Build the Actions File

    To finalize the Grant List Permissions activity and configure it for use in SharePoint Designer, we need to edit the .actions4 file. In this case, the file should resemble the following:
    <Action Name="Grant List Permissions" ClassName="SiteManagementActivities.GrantListPermissions" Category="Site Management" AppliesTo="all">
      <RuleDesigner Sentence="Grant the permission level %1 to user or group %2 on the list named %3 on web %4 (Output: %5)">
        <FieldBind  Field="permissionLevel" Text="Permission Level Name" Id="1" />
        <FieldBind  Field="principalLoginName" Text="Principal Login Name" Id="2" />
        <FieldBind  Field="listTitle" Text="List Title" Id="3" />
        <FieldBind  Field="webUrl" Text="SPWeb URL" Id="4" />
        <FieldBind  Field="responseStatusCodeOut" Text="Response Status Code" Id="5" />
      </RuleDesigner>
      <Parameters>
        <Parameter Type="System.String, mscorlib" Direction="In" Name="permissionLevel" />
        <Parameter Type="System.String, mscorlib" Direction="In" Name="principalLoginName" />
        <Parameter Type="System.String, mscorlib" Direction="In" Name="listTitle" />
        <Parameter Type="System.String, mscorlib" Direction="In" Name="webUrl" />
        <Parameter Type="System.String, mscorlib" Direction="Out" Name="responseStatusCodeOut" />
      </Parameters>
    </Action>

    Once you've deployed the solution, activated the feature and cleared the SharePoint Designer cache, you should be able to use the Grant List Permissions activity in SharePoint Designer workflows.

    Server-side activities have been updated

    $
    0
    0
    If you use SharePoint Designer 2013 to build workflows, there's a fair chance you'll have come across the following error message:
    Server-side activities have been updated. You need to restart SharePoint Designer to use the updated version of activities.
     Needless to say, restarting SharePoint Designer rarely makes the error go away. The usual advice is:

    Approach 1: Clear the cache folders
    See for example How to Clear Your SharePoint Designer 2010/2013 Cache. If you've just deployed some custom workflow activities to your site, this will probably solve your problem (and you should clear the cache folders every time you deploy custom activities). If the error occurs spontaneously, this approach often won't help.

    Approach 2: Reinstall SharePoint Designer
    This might work if you've got a preview version of SharePoint Designer installed. If not, it's unlikely to help. It didn't work for me, and it didn't work for countless others on the forums.

    Approach 3: Install SharePoint Designer on another machine
    This one kind of annoys me... it usually works, but it's hardly a practical solution to the problem.

    In my case, having tried approach 1 and 2 and having established that the problem was client-specific (a colleague was able to connect to the same sites and create workflows just fine), I did some digging around to see what else could be causing the problem.

    Short Answer

    (If you're working on a Windows client rather than a SharePoint server)

    Check your Programs list for Workflow Manager Client 1.0. If it's there, uninstall it. The Workflow Manager Client needs to run on every SharePoint server in a farm when you pair the farm with a Workflow Manager deployment. In my case, I'm using SharePoint Designer on my laptop to build workflows on an Office 365 site, so there was no reason for the Workflow Manager Client to be there. (I'm not even sure how it got there - maybe bundled with Visual Studio.)

    In my case, once I'd uninstalled Workflow Manager Client, I was able to create and edit workflows in SharePoint Designer without errors.

    Long Answer ("Show your work")

    I started by getting a colleague, John Devaney, to run SharePoint Designer and connect to the site. Once we'd established he was able to create and edit workflows, we compared the contents of our cache folders. The contents of the WebsiteCache folder (%USERPROFILE%\AppData\Local\Microsoft\WebsiteCache) showed some key differences. When you drill down into the version folder for a particular site, mine looked like this:


    Whereas John's looked like this:


    We'd both started with empty cache folders. However, John's SharePoint Designer instance downloaded, generated, or copied in a handful of assemblies and culture definitions (the NLP files), whereas mine failed to do so. 

    I experimented with copying these files across to my own cache folder. The key file turned out to be the Microsoft.SharePoint.WorkflowServices.Activities.Proxy.dll assembly. If I copied this assembly across to my cache folder, I was able to create and edit workflows. Without it, I got the Server-side activities have been updated error.

    Next, I had a closer look at how SharePoint Designer goes about getting these assemblies. I used Fiddler to look at the web traffic that SharePoint Designer generates when I try to create a new workflow. It calls various client-side object model (CSOM) methods, including two methods in the WorkflowDeploymentService class:
    • GetDesignerActions. According to MSDN, this method "returns a list of valid Workflow Manager Client 1.0 actions for the specified server". As you'd expect, the response body contains a bunch of SharePoint Designer actions in .actions4 (XML) format.
    • GetActivitySignatures. This method takes a single DateTime argument named lastChanged, which suggests a connection to SharePoint Designer caching. Again, as you'd expect, the response body contains a set of activity definitions in XAML format.
    The fact that these methods interact with Workflow Manager Client 1.0 on the SharePoint server got me thinking, so I checked the Programs list on my laptop. The working theory is that information on the local instance of Workflow Manager Client could conflict with the information returned by the server, and somehow prevent SharePoint Designer from generating the proxy assemblies. Regardless, uninstalling the local Workflow Manager Client instance solved the problem for me.

    Seeing as it's not an easy issue to replicate, I'd be interested to hear whether this fix works for other people.

    Can't find Business Data Web Parts? Check your permissions.

    $
    0
    0
    Just a quick note on an issue we encountered today. Users with the Contribute permission level can, as you'd expect, edit wiki pages in SharePoint 2013. As part of the editing process, users can add various web parts to the wiki page. Today we were temporarily stumped when a user with Contribute permissions wanted to add a Visio Web Access web part to a wiki page. It turns out that this web part, along with most business data web parts, is only available when the user has the Add and Customize Pages permission (found in the Design permission level).

    With the Contribute permission level, the insert web part options looked like this:


    Whereas with the Design permission level, the insert web part options looked like this:


    Conclusion - if your users are struggling to add business data web parts to wiki pages, it might be a permissions issue.

    Site Management Workflow Activities - Sample Solution Now Available

    $
    0
    0
    Earlier this year, I published a series of blog posts on custom workflow activities for SharePoint 2013 and Office 365. Among other things, I covered how to build workflow activities to:

    • Create sites.
    • Set site permissions and list permissions.
    • Create groups and set group owners.
    • Break permissions inheritance.
    • Set the associated owners, members and visitors groups on a site.
    Since then, several people have asked me to make my source solution available - so here it is:


    Disclaimers:
    • It's proof-of-concept code, not production-ready code. 
    • For use as a learning aid in a test environment only.
    • Please read the corresponding blog posts before you play around with the custom activities - they'll make much more sense once you've read the explanations.
    To build and test the solution, you'll need a test environment with a local SharePoint 2013 installation, SharePoint Designer 2013, and Visual Studio 2012 with Office Developer Tools or Visual Studio 2013.

    When you build the solution, Visual Studio creates a .wsp package. You can add this to the solutions gallery on any SharePoint site (including Office 365) - workflow activities in SharePoint 2013 are entirely declarative, so you don't have to worry about resource points and other restrictions. The solution deploys a site-scoped feature named Site Management Workflow Activities. Once you've activated this feature, the custom activities will be available when you open the site in SharePoint Designer.

    Final note: To run these activities, your workflow service needs to be running with app permissions and it needs full control rights over the entire site collection (as you'd expect - you're asking it to create sites, create groups, set permissions, and so on). For guidance, see my first post in the series and the MSDN article Create a workflow with elevated permissions by using the SharePoint 2013 Workflow platform.

    Getting and Setting Managed Metadata Fields in SharePoint 2013 Workflows

    $
    0
    0
    In many workflow scenarios, you'll want to get a field value from a list item in one list and apply that value to a list item on another list. With most field types, you can do this easily using workflow variables and built-in list actions in SharePoint Designer 2013. However, it's widely acknowledged that working with managed metadata fields in SharePoint workflows is a bit of a nightmare. To get around the problem, I built some custom workflow activities to get and set managed metadata fields in SharePoint Designer workflows.

    This is the first of a three-part series on working with managed metadata fields in workflows:


    Problem overview


    Managed metadata fields are similar in structure to lookup fields, with complex values of type TaxonomyFieldValue. If you use the REST API to get or set the value of a managed metadata field named Customer, the JSON payload looks something like this:

    {"Customer":{
       "__metadata":{"type":"SP.Taxonomy.TaxonomyFieldValue"},
       "Label":"n",
       "TermGuid":"nnnnnnnn-nnnn-nnnn-nnnn-nnnnnnnnnnnn",
       "WssId":n }}

    You can see that the managed metadata field consists of three property values, where TermGuid uniquely identifies the term, Label represents the display name for the term, and WssId is the ID of the list item that stores the term locally in the TaxonomyHiddenList list.
      Unfortunately, the built-in list actions in SharePoint Designer 2013 (Create List Item, Update List Item, Set Field in Current Item) will only allow you to set a managed metadata field to a string value. When you try to update a managed metadata field value, SharePoint is expecting a complex type in the format you can see above. However, any value you supply through a built-in list action in SharePoint Designer gets wrapped in quote marks and is treated as a string literal. Behind the scenes, SharePoint throws an InvalidClientQuery exception when it receives the request from your workflow, with the following message:

      An unexpected 'PrimitiveValue' node was found when reading from the JSON reader. A 'StartObject' node was expected.


      Distractions


      You may have read that you can specify string values for managed metadata fields using the format <WssId>;#<Label>|<TermGuid>. That may have worked in SharePoint 2010 workflows, but it doesn't work in SharePoint Designer 2013 where workflow activities are built on the client web services. The error is clear - SharePoint is expecting a complex object, and it complains when the workflow manager sends it a string. It's also worth noting that the built-in list actions in SharePoint Designer don't expose hidden taxonomy fields.

      Solution overview


      To update the value of a managed metadata field, your workflow needs to send a request that looks something like this:

      POST http://team.jason.net/_api/web/lists/getbyid(guid'fe31bb2a-8737-4085-be2e-70368115c688')/Items(29) HTTP/1.1
      If-Match: *
      X-HTTP-Method: MERGE
      Accept: application/json; odata=verbose
      Content-Type: application/json; odata=verbose
      ...

      {"Customer":{"__metadata":{"type":"SP.Taxonomy.TaxonomyFieldValue"},"Label":"1","TermGuid":"47081a2a-c78d-495c-bea9-e1ba8522e881","WssId":"-1"},"__metadata":{"type":"SP.Data.ClientsListItem"}}

      You need to plug four values into the JSON payload:
      • The name of the managed metadata field (Customer in this example). 
      • The Label value. This can either be the string-based term label or an integer-based lookup value. If you used the REST API to get the term details from an existing list item, you'll have an integer value.
      • The TermGuid value. 
      • The WssId value. You can safely set this value to -1. SharePoint will resolve the term correctly from the Label and TermGuid values.
      You could do this with a Call HTTP Web Service activity in SharePoint Designer, but structuring the data would be ugly and laborious. A more elegant solution is to create a couple of custom activities in Visual Studio that you can reuse in multiple SharePoint Designer workflows. In part 2 I'll show you how to create a custom activity to get managed metadata field values, and in part 3 I'll show you how to create a custom activity to set managed metadata field values.

      Custom Workflow Activity for Getting Managed Metadata Field Values

      $
      0
      0
      In this post I'll show you how to build a custom workflow activity in Visual Studio that gets managed metadata field values from a SharePoint 2013 list or library. You can use the workflow activity in any SharePoint Designer list workflows, including on Office 365 sites - custom workflow activities in SharePoint 2013 are entirely declarative, so deploying to SharePoint Online is not a problem.

      This is the second of a three-part series on working with managed metadata fields in workflows:
      I'll assume you know the basics of how to build and deploy custom workflow activities - if you need a bit more detail on the deployment side of things, have a read through my first post on custom workflow activities. For now, let's just say I've created a new custom workflow activity named Get MMS Field Value in Visual Studio.

      Arguments and Variables

      I'll start with a quick run through of the arguments and variables I've used in the activity. First the arguments:


      The activity will get the value of a managed metadata field from the current list item, so we only need the caller to provide one argument value - the name of the field (mmsFieldName). We want to return two values to the caller: the term GUID (termGuidOut) and the term label integer (labelOut).

      Now the variables:


      We'll use listItemFields to store a JSON representation of the list item. The DynamicValue type is perfect for storing and manipulating JSON data. We'll use fieldPathTermGuid and fieldPathLabel to build the XPath expressions we need in order to isolate and extract the term GUID and the term label from the list item JSON.

      Activity Design

      The workflow activity consists of seven child activities:


      1. Get the current list item.
      2. Build an XPath expression to find the TermGuid property of the specified managed metadata field value.
      3. Build an XPath expression to find the Label property of the specified managed metadata field value.
      4. Add a try-catch block so we can catch any errors when we parse the list item.
      5. Within the try block, use the XPath expression we created earlier to get the TermGuid property from the managed metadata field value.
      6. Within the try block, use the XPath expression we created earlier to get the Label property from the managed metadata field value.
      7. Within the catch block, catch invalid operation exceptions and log the details to the workflow history list. (Invalid operation exceptions occur if the specified field does not exist or is not a managed metadata field.)

      Let's walk through each of these in turn.


      Step 1 - Get the current list item


      The first task is to retrieve the list item from which you want to extract the managed metadata field:


      I've used a LookupSPListItem activity to do this. The activity returns the JSON representation of the list item as a DynamicValue instance, which I've assigned to the listItemFields variable.


      Step 2 - Build an XPath expression to find the TermGuid property


      Now we've got the JSON representation of the list item, we need to figure out how to extract the properties we need. The only effective way to do this is to use the Visual Studio debugger (or a web debugger such as Fiddler) to take a look at the raw JSON data. In my development environment, it looks something like this:

      {"d":{"results":[{"__metadata":{"id":"Web\/Lists(guid'77190d4b-c6a4-4e15-ac04-d3124492ca88')\/Items(5)","uri":"http:\/\/team.jason.net\/_api\/Web\/Lists(guid'77190d4b-c6a4-4e15-ac04-d3124492ca88')\/Items(5)","etag":"\"59\"","type":"SP.Data.CustomersListItem"},"FirstUniqueAncestorSecurableObject":{"__deferred":{"uri":"http:\/\/team.jason.net\/_api\/Web\/Lists(guid'77190d4b-c6a4-4e15-ac04-d3124492ca88')\/Items(5)\/FirstUniqueAncestorSecurableObject"}},"RoleAssignments":{"__deferred":{"uri":"http:\/\/team.jason.net\/_api\/Web\/Lists(guid'77190d4b-c6a4-4e15-ac04-d3124492ca88')\/Items(5)\/RoleAssignments"}},"AttachmentFiles":{"__deferred":{"uri":"http:\/\/team.jason.net\/_api\/Web\/Lists(guid'77190d4b-c6a4-4e15-ac04-d3124492ca88')\/Items(5)\/AttachmentFiles"}},"ContentType":{"__deferred":{"uri":"http:\/\/team.jason.net\/_api\/Web\/Lists(guid'77190d4b-c6a4-4e15-ac04-d3124492ca88')\/Items(5)\/ContentType"}},"FieldValuesAsHtml":{"__deferred":{"uri":"http:\/\/team.jason.net\/_api\/Web\/Lists(guid'77190d4b-c6a4-4e15-ac04-d3124492ca88')\/Items(5)\/FieldValuesAsHtml"}},"FieldValuesAsText":{"__deferred":{"uri":"http:\/\/team.jason.net\/_api\/Web\/Lists(guid'77190d4b-c6a4-4e15-ac04-d3124492ca88')\/Items(5)\/FieldValuesAsText"}},"FieldValuesForEdit":{"__deferred":{"uri":"http:\/\/team.jason.net\/_api\/Web\/Lists(guid'77190d4b-c6a4-4e15-ac04-d3124492ca88')\/Items(5)\/FieldValuesForEdit"}},"File":{"__deferred":{"uri":"http:\/\/team.jason.net\/_api\/Web\/Lists(guid'77190d4b-c6a4-4e15-ac04-d3124492ca88')\/Items(5)\/File"}},"Folder":{"__deferred":{"uri":"http:\/\/team.jason.net\/_api\/Web\/Lists(guid'77190d4b-c6a4-4e15-ac04-d3124492ca88')\/Items(5)\/Folder"}},"ParentList":{"__deferred":{"uri":"http:\/\/team.jason.net\/_api\/Web\/Lists(guid'77190d4b-c6a4-4e15-ac04-d3124492ca88')\/Items(5)\/ParentList"}},"FileSystemObjectType":0,"Id":5,"ContentTypeId":"0x0100B48DCF9FDA5C9B4BACDCC7DF84D111480007A91266528ED647BA59883DA1C209A8","Title":"Test5","Customer":{"__metadata":{"type":"SP.Taxonomy.TaxonomyFieldValue"},"Label":"1","TermGuid":"47081a2a-c78d-495c-bea9-e1ba8522e881","WssId":1},"TempCol":null,"MMS_x0020_Test_x0020_2":null,"Test_x0020_Create_x0020_List_x00":{"__metadata":{"type":"SP.FieldUrlValue"},"Description":"Stage 1","Url":"http:\/\/team.jason.net\/_layouts\/15\/wrkstat.aspx?List=77190d4b-c6a4-4e15-ac04-d3124492ca88&WorkflowInstanceName=96478011-ec99-469a-a209-c8b1170d0dc1"},"ID":5,"Modified":"2014-10-15T16:49:42Z","Created":"2014-10-08T13:55:57Z","AuthorId":1,"EditorId":1,"OData__UIVersionString":"1.0","Attachments":false,"GUID":"1e222378-6ebc-421f-b87f-f5374d9b8566"}]}}

      I've highlighted the bits we're interested in. In this case, we can figure out that the XPath expression to get to the TermGuid property is as follows:

      d/results(0)/Customer/TermGuid

      Note that the results property actually contains an array of one result, so we use results(0) to get the first object in the array.

      We can use an Assign activity to create our XPath expression and assign it to the fieldPathTermGuid variable. If we replace Customer (the MMS field name in this example) with a placeholder for our mmsFieldName variable, the activity looks like this:


      Remember that we're not using the XPath expression at this stage - we're just building an XPath expression from the workflow variables to use in a later task.


      Step 3 - Build an XPath expression to find the Label property


      We can use the same approach to build an XPath expression that retrieves the Label property - only the last node of the XPath expression is different. In this case we assign the XPath expression to our fieldPathLabel variable: 


      Step 4 - Add a try-catch block

      When we come to actually parse the list item, there's quite a lot that could go wrong. If the list item doesn't contain the specified field name, or the specified field is not a managed metadata field, the XPath expressions will fail and the workflow will throw an InvalidOperationException. As such, we want to build the parsing logic within a TryCatch activity:


      Here you can see that we attempt to get the salient managed metadata field properties within a Try block, and we look for an InvalidOperationException in the Catch block. We'll look more closely at the activities within the Try and Catch blocks in the next step. For now, notice that the activities within the Try and Catch blocks are wrapped in Sequence activities. In a production scenario you will probably want to implement a more comprehensive error handling strategy, but for this proof-of-concept scenario I'm mainly interested in catching the common invalid operation exceptions.

      Steps 5 and 6 - Get the TermGuid and Label property values

      Within our Try block, we can use generic GetDynamicValueProperty<T> activities to get the TermGuid and Label property values:


      In each case:

      • The Source property is the JSON representation of our list item.
      • The PropertyName property is the XPath expression that finds our TermGuid or Label property.
      • The Result property is the output argument that exposes each property to SharePoint Designer workflows.

      Step 7 - Catch invalid operation exceptions

      Within our InvalidOperationException catch block, all I'm doing at this stage is writing a (hopefully) helpful message to the workflow history list:


      The Actions File

      The next stage is to build the actions (.actions4) file for the workflow activity. The actions file defines the sentence that appears in SharePoint Designer when you add the custom activity to a workflow, together with the arguments (inputs and outputs) for the custom activity. I'll assume you know the basics of actions files - if not, check out my first post on custom workflow activities. In my case, the actions file looks like this:


      As you can see from the Sentence attribute in the RuleDesigner element, we require the workflow designer to specify the name of the managed metadata field, and we return the term GUID and the term label integer value. Note that in the parameter definition for the mmsFieldName argument, we specify a DesignerType of FieldNames. This enables the workflow designer to select the name of the managed metadata field from a list of all the fields in the current list item.

      In the SharePoint Designer workflow designer, the custom activity looks like this:


      In this case, I've created a really simple SharePoint Designer workflow to test my custom activity. I use the custom activity to get the term GUID and term label integer properties from a managed metadata field named Customer, and I write the values to the workflow history list.

      In the next post, I'll look at the other half of the problem - using these managed metadata field properties to update a managed metadata field in another list.

      Custom Workflow Activity for Setting Managed Metadata Field Values

      $
      0
      0
      In this post I'll show you how to build a custom workflow activity in Visual Studio that can update managed metadata field values in a SharePoint 2013 list or library. This is the final part of a three-part series on working with managed metadata fields in workflows:
      • Getting and Setting Managed Metadata Fields in SharePoint 2013 Workflows. In this post, I introduce the scenario, explain why you can't use built-in list actions to work with managed metadata fields, and provide a conceptual overview of the custom workflow activities approach.
      • Custom Workflow Activity for Getting Managed Metadata Field Values. In this post, I'll walk you through how to build a custom workflow activity in Visual Studio that gets managed metadata field values from a list item.
      • Custom Workflow Activity for Setting Managed Metadata Field Values (this post). In this post, I'll walk you through how to build a workflow activity that sets managed metadata field values on a list item.
      I've said it before, but it's worth repeating - you can use these custom workflow activities in any SharePoint Designer list workflows, including on Office 365 sites - custom workflow activities in SharePoint 2013 are entirely declarative, so deploying to SharePoint Online is not a problem.

      This series of posts tackles the scenario where you want to extract a managed metadata field value from an item in one list (previous post), and then apply that value to a managed metadata field in another list (this post). The main constraint is that the managed metadata fields in the source list and the destination list must both use the same term set. 

      Arguments and Variables

      If you've been following the series of posts you'll be familiar with the scenario and the concepts, so let's assume we've created a brand new custom workflow activity named Set MMS Field Value in Visual Studio and jump straight into defining arguments and variables. First the arguments:


      I want to be able to use this activity update a managed metadata field on any SharePoint list or library, so the first piece of information we need is an identifier for the target list or library (selectedList). Next, we need to know which list item to update. List items are commonly identified using either a GUID identifier (listItemGuid) or an integer identifier (listItemIdIn) - I've defined arguments for both so the workflow designer can use either approach to identify the target list item. Next, we need to know the name of the managed metadata field in the target list item (mmsFieldName). Finally, we need the two property values that uniquely identify our managed metadata term (termGuid and termLabelInteger).

      Now the variables:


      We'll use listItemId to store the integer identifier for the target list item. The emptyGuid variable is just an empty GUID that we'll use for comparison purposes, and the remaining variables (metadataDV, propertiesDV and fieldValueDV) are DynamicValue properties that we'll use to progressively build the correct JSON structure to update a managed metadata field.

      Activity Design

      The workflow activity consists of seven child activities that correspond to three main tasks:


      1. Get the integer identifier of the target list item. (If the workflow designer has provided an integer identifier, use it directly. Alternatively, if the workflow designer has provided a GUID identifier, use the GUID to look up the integer identifier.)
      2. Build up the JSON payload we must provide in order to update the specified managed metadata field.
      3. Update the specified managed metadata field on the specified list item.
      Let's take a closer look at these three high-level tasks.

      Task 1 - Get an integer identifier for the target list item

      Our first task is to get an integer identifier for the target list item. Remember that we're giving the workflow designer two options: he or she can provide either a GUID identifier or an integer identifier to specify the target list item. To cater for both scenarios, we use an If activity. If the list item GUID is equal to an empty GUID, we can assume the workflow designer has used an integer identifier to specify the target list item. In this case, we use an Assign activity to set the the listItemId variable to the value of the listItemIdIn argument. If not, we use a LookupSPListItemId activity to look up the integer identifier using the specified GUID and then set the listItemId variable accordingly.


      Task 2 - Build a JSON payload for the target managed metadata field

      Our next task is to build a JSON payload for the target managed metadata field. The payload must take the following format, where <Field name> is the name of the target managed metadata field, <Term label integer> is the term label integer of the managed metadata term, and <Term GUID> is the term GUID of the managed metadata term:


      {"<Field name>":{
         "__metadata":{"type":"SP.Taxonomy.TaxonomyFieldValue"},
         "Label":"<Term label integer>",
         "TermGuid":"<Term GUID>",
         "WssId":-1 }}


      To take advantage of the built-in child activities in Visual Studio, we need to create our JSON payload using DynamicValue structures. Because of the nested nature of this payload, we need to build the structure progressively from the inside out. First we use a BuildDynamicValue activity to build the contents of the innermost braces (the value of the __metadata property):


      Next, we use a BuildDynamicValue activity to build the value of the middle set of braces (the value of the <Field name> property):


      Notice how we set the __metadata key to the metadataDV value we created in the previous step, thereby creating a nested DynamicValue instance.

      Finally, we use a CreateDynamicValue activity to build the value of the outer set of braces:


      Note: We use a CreateDynamicValue activity rather than a BuildDynamicValue activity in this task because it allows us to set the dictionary key (PropertyName) to a variable value (mmsFieldName in this case). The BuildDynamicValue activity only allows you to type static string text for the dictionary key (Path). That wouldn't work in this scenario as we don't know the name of the target managed metadata field at compile time.

      Task 3 - Update the target list item

      Now that we've identified our target list item and build our JSON payload, all that remains is to perform the update operation on the list item. We can use the built-in UpdateListItem activity to do this:


      The Actions File

      The next stage is to build the actions (.actions4) file for the workflow activity, to specify how our activity should behave when we add it in SharePoint Designer. My actions file looks like this:


      I won't go into more detail on the structure of the actions file right now, as there's nothing out of the ordinary in it and I don't want to get too repetitive. When you deploy the activity and use it in SharePoint Designer, it looks like this:


      In this case, I'm using my Get MMS Field Value activity to get the term GUID and the term label integer from a managed metadata field named Customer in the current list item. I'm then using the Set MMS Field Value activity to set the value of the Client field on a list item in the Clients list to the same term. Because the source Customer field and the destination Client field both use the same term set, the workflow is able to copy the value across as desired.

      Programming eDiscovery in SharePoint Server 2013

      $
      0
      0
      Recently I needed to get a grip on how to work with the eDiscovery tools in SharePoint 2013 from the server-side object model. There's not much information out there on how to do this (and some of the information out there is plain wrong), so I built a proof-of-concept console app to work through the key features, including:

      • Programmatically retrieving an eDiscovery case.
      • Creating a new source.
      • Creating a custodian.
      • Creating a new source.
      • Creating a new eDiscovery set.
      • Using queries and exports.
      • Applying in-place holds to eDiscovery sets.

      I'll keep the explanation to a minimum, as I'm hoping the code largely speaks for itself. I'll assume you know the basic concepts of eDiscovery in SharePoint 2013, including how to work with cases, sources, sets, queries, and exports through the UI. To use the code, you'll need assembly references to Microsoft.SharePoint.dll and Microsoft.Office.Policy.dll. All the eDiscovery classes you need are in the Microsoft.Office.Server.Discovery namespace.

      Our first task is to retrieve a case. An eDiscovery case is an individual site (SPWeb) within your eDiscovery Center site collection. Individual eDiscovery cases are represented by the Case class. The Case class provides the entry point for all eDiscovery operations in code. To retrieve a case, you need to call the Case constructor and pass the corresponding SPWeb instance as a parameter:

      using (SPSite site = new SPSite("http://sp2013/sites/ediscovery/"))
      using (SPWeb webCase = site.OpenWeb("case1"))
      {
      Case myCase = new Case(webCase);

      Next, let's use the Case instance to create a new custodian. Essentially all this does is create a new list item in the Custodians list in the case web. Later, you'll see how we can assign custodians to sources to indicate who's responsible for the source:

      //Create a custodian
      Custodian newCustodian = myCase.CreateCustodian();
      newCustodian.Name = "Legal Eagle";
      newCustodian.LoginName = "JASON\\bob"; // i.e. domain username
      newCustodian.Update();

      Next let's create a new source. Essentially, SharePoint 2013 eDiscovery sources are either SharePoint webs or Exchange mailboxes. In both cases, the source is represented by the Source class. To create a new source from a SharePoint web, you call the Case.CreateLocation method. To create a new source from an Exchange mailbox, you call the Case.CreateMailbox method. I'm going to focus on creating a source from a SharePoint web. Once you've created the new Source instance, if you want it to work properly, you need to set three key properties:
      • Set the Source.WebId property to the ID of the SPWeb for which you want to define a source.
      • Set the Source.SiteId property to the ID of the SPSite containing the web for which you want to define a source.
      • Set the Source.FederationId property to the ID of the search result source (e.g. "Local SharePoint Results") from which you want to retrieve content.
      Getting the ID of webs and sites is straightforward. Getting the ID of the search result source is a little more complex (credit). The code looks like this:


      Guid targetSiteId;
      Guid targetWebId;
      Guid resultSourceId;

      // Get the site ID and the web ID for the source
      using(SPSite targetSite = new SPSite("http://team.jason.net/"))
      {
      targetSiteId = targetSite.ID;
      var targetWeb = targetSite.RootWeb;
      targetWebId = targetWeb.ID;
      }

      // Get a result source ID from the search service application
      SearchQueryAndSiteSettingsServiceProxy searchSettingsProxy =
      SPFarm.Local.ServiceProxies
          .GetValue<SearchQueryAndSiteSettingsServiceProxy>();
      SearchServiceApplicationProxy searchProxy =
      searchSettingsProxy.ApplicationProxies
          .GetValue<SearchServiceApplicationProxy>("Search Service Application");
          SearchObjectOwner serviceApplicationOwner = new      
          SearchObjectOwner(SearchObjectLevel.Ssa);
      SourceRecord serviceApplicationResultSource = searchProxy.GetResultSourceByName("Local SharePoint Results", serviceApplicationOwner);
      resultSourceID = serviceApplicationResultSource.Id;

      // Create the new eDiscovery source
      Microsoft.Office.Server.Discovery.Source newSource = myCase.CreateLocation();
      newSource.Name = "Team Site";
      newSource.DisplayId = "http://team.jason.net";
      newSource.FederationId = resultSourceID;
      newSource.SiteId = targetSiteId;
      newSource.WebId = targetWebId;
      newSource.AddCustodian(newCustodian);
      newSource.Update();

      Now that we've created a source, we can use it in eDiscovery sets or queries. In the object model, eDiscovery sets are represented by the SourceGroup class. Let's create a new one and add our source to it:

      // Create a new eDiscovery Set
      SourceGroup newSet = myCase.CreateSourceGroup();
      newSet.Name = "Team Site Leaflets";
      newSet.AddSource(newSource);
      newSet.DateStartFilter = new DateTime(2015, 1, 1);
      newSet.Query = "Leaflet";

      newSet.Update();

      If you want to apply an in-place hold to the set, you simply set the SourceGroup.Preserve property to true and then call the Update method:

      // Put the set on hold
      newSet.Preserve = true;

      newSet.Update();

      Note that this requests an in-place hold. The hold won't actually take effect until the eDiscovery In-Place Hold Processing timer job runs.

      Next, let's look at how to create a query. In the object model, queries are represented by the SavedSearch class:

      // Create a new query based on the discovery set we created earlier
      SavedSearch newQuery = myCase.CreateSavedSearch();
      newQuery.Name = "Coded Query";
      newQuery.SourceManagement = SourceManagementType.SourceGroup;
      newQuery.SourceGroupIds.Add(1) // SPListItem ID of the discovery set
      newQuery.Deduplication = true;
      newQuery.SPFilters = "Created<=2/15/2015";
      newQuery.Update();

      When you create a query through the UI, you can choose whether to include eDiscovery sets (each consisting of one or more sources with filter criteria) or sources (no filter criteria). In the object model, you specify query scope by setting the SavedSearch.SourceManagement property to one of the following SourceManagementType enumeration values:

      • SourceManagementType.AllContent. This corresponds to the All case content option in the UI. The query contains all the sources defined in the case, with any eDiscovery set filters applied.
      • SourceManagementType.SourceGroup. This corresponds to the Select eDiscovery sets option in the UI. The query contains the sources defined in the discovery sets you select, with any discovery set filters applied.
      • SourceManagementType.Source. This corresponds to the Select sources option in the UI. The query contains the sources you select, and no discovery set filters are applied.
      Once you've configured this property, you can either add sources or discovery sets to the query by adding integer IDs to the SourceIds or SourceGroupIds collections respectively. In this example, I've specified the SourceManagementType.SourceGroup option and then added the integer ID of my discovery set to the SourceGroupIds collection.

      The SavedSearch class also allows you to specify string filters and refiners for the query. You can use the SPFilters and SPRefinements properties to specify filters and refiners for SharePoint sources, and you can use the EXFilters and EXRefinements properties to specify filters and refiners for Exchange mailboxes. A word of warning, however - the syntax required for the refinement properties is not user friendly. For example, if you create a query with refiners that match a file extension of "txt" and an author of "Administrator", the SPRefinements property ends up looking like this:

      [{"n":"Author","t":["Administrator"],"o":"and","k":false,"m":null},"n":"FileExtension","t":["\"??747874\""],"o":"OR","k":false,"m":{"\"??747874\"":"txt"}}]

      So it's probably fair to say that our ability to create query refiners in code is limited.

      Finally, let's take a look at how to create an export in code. When you create an export, you're essentially just adding an item to the Exports list in the case web. However, the Export class does expose a ResultLink property that enables you to get the exported and packaged discovery content.

      Export myExport = myCase.CreateExport(true, true, true);
      myExport.Name = "Coded Export";
      myExport.AddSearch(newQuery);
      Console.WriteLine(String.Format("Download link: {0}", myExport.ResultLink));
      }

      That's it - I think that pretty much covers all the key bits of using SharePoint eDiscovery in code. Hope it helps.

      SharePoint Server 2013 and SQL Server Full-Text Search

      $
      0
      0
      There's long been some debate as to whether or not SharePoint requires you to install the SQL Server Full-Text Search feature on the database server. I've worked on the premise that it doesn't - SharePoint has its own search engine, etc.

      However, the Access Services service application DOES require the Full-Text Search feature. If this feature is not installed, you'll get an error when you attempt to provision an Access Services service application that states "The Application Database Server does not have the Full-Text Search feature installed".


      Access Services actually places a whole bunch of extra demands on the database server in addition to the Full-Text Search requirement. For example:

      • The database server must be running at least SQL Server 2012 (SharePoint Server 2013 will run happily on SQL Server 2008 R2 SP1)
      • The SQL Server instance must support mixed mode authentication.
      • The SQL Server instance must support Named Pipes in addition to TCP/IP.
      For more information, take a look at the SharePoint 2013: Access Services wiki page on TechNet. Of course, there's nothing to stop you using a separate SQL Server installation to host your Access Services databases. This probably isn't a bad idea if you're planning to use Access Services heavily.
      Viewing all 56 articles
      Browse latest View live